Friday, March 30, 2012

Spring Pink

Happy Friday! The weather last week was the warmest I can recall for a March in Toronto. Some days even felt a bit like summer! I wanted my nails to resemble the weather, plus I got to try one of my newest Revlon's, Popular.


Popular is a light pink that I want to say is a jelly, but it has a milkiness to it. Suspended within are silver hex and regular glitter. The milky pink makes the silver glitter appear white and almost iridescent and I like it :) I almost wished they had used white glitter instead.

I only needed 2 coats for full coverage and application was a breeze. The polish is saturated with glitter so I didn't have to go fishing around in the bottle.


My only complaint, and I found that the is common for polishes with hex glitter (I.e. Across the Universe) is that after a few days of wear the hex glitter starts to break free and come off. This is with a layer of top coat on too so that baffles me! Otherwise this is the perfect dainty pink for spring :)

Thursday, March 29, 2012

My First Nfu Oh!

Of course it's a flakie, right!? When I first heard of Nfu Oh's is was because of their awesome collection of flakie polishes. Nfu Oh 51 had to of been one of my first lemmings, and to actually have it apart of my collection now is so exciting!

I didn't realize how complex this polish actually was. I has assumed it was a flakie in a purple jelly base with some shimmer. But I must have been missing the comments about the magical mutichrome shimmer comparable to Clarin's 230. And that is why there are so many photos for today's post :)


So, moving on, long story short this polish kicks ass! It was super hard to capture it's awesomeness but I tried! Now on to how I wore it, I layered two thin coats over Revlon's Royal.


It's like a new polish in different lighting! My favorite is when it's overcast, you really get to see all the depth this complex polish has to offer. My boyfriend noticed this on my nails and was like cool, it's green and orange! But when we were in different lighting he was confused by the red shimmer it gave off (like in the photo above). Wasn't it green?


Next time I want to try this on it's own, but I also can't wait to see what it looks like layered over some other polishes. Such a great polish and I actually love it more now than I ever have!

Wednesday, March 28, 2012

Hauling

Wow, I haven't done a haul post in quite some time now, I haven't really gone out and bought a bunch of polish all at once so I decided to combine my polish purchases from the last couple months and show you what I've been buying.

I don't even know where to start, do in no specific order...


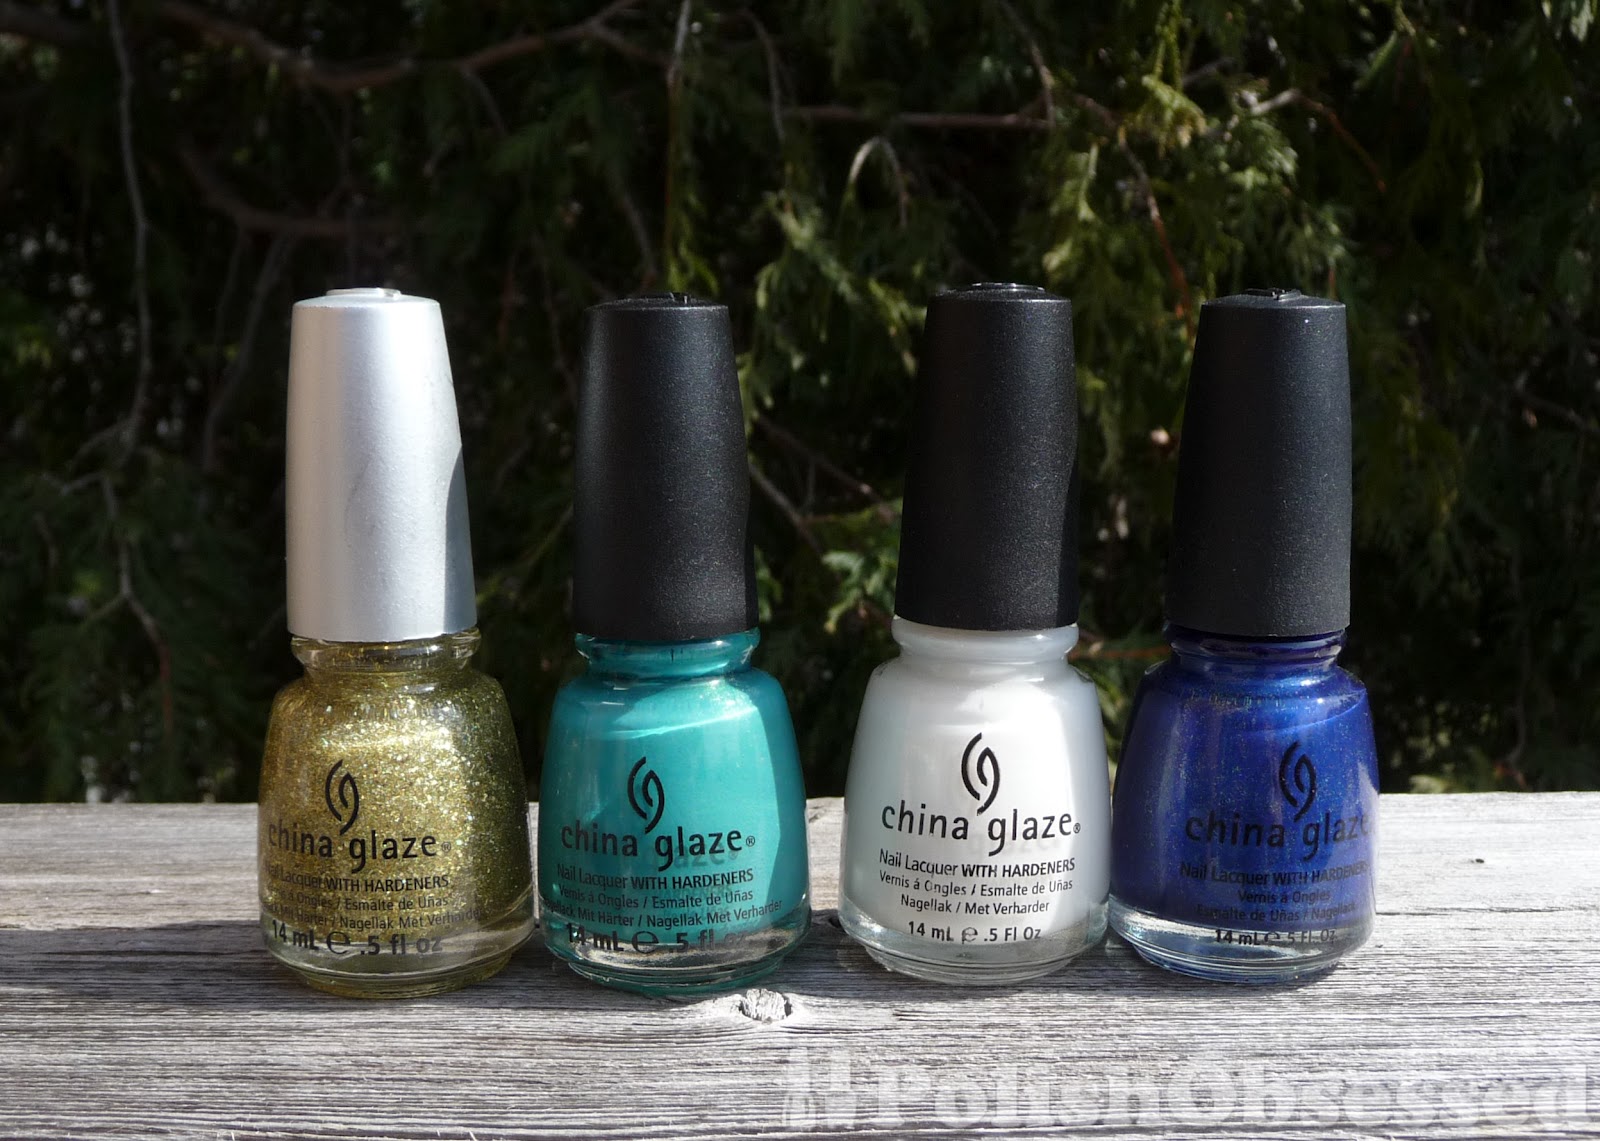
I ordered some China Glazes from the Beauty Joint, they must have just started carrying them because I don't remember ten being there before! They are a great price too, only $3.99! I picked up Custom Kicks and Moonlight (the middle two in the photo below), which you've seen me already post about a while back.


Also in the above photo is China Glaze, Eyes Like Sapphires and Blond Bomshell. Eyes Like Sapphires is a deep blue shimmer with silver glitter sprinkled throughout. I got this on clearance at a local beauty supply for $2.99. I found Blond Bombshell from the LE Eye Candy collection at Sally's on clearance for $1.99! I love this gold glitter :)

During a recent trip to the U.S I finally found a CVS, I was hoping to find the new Spoiled polishes, but this location didn't have them in yet, they were on sale too :( What I ended up finding was the LE Wet n' Wilds :) I picked up Diamond in the Rough which is also a dupe for China Glaze's Some Like it Haute, and Sally Hansen's Glitz Gal from the Crushed Gems collection. I consider it the black version of OPI's Teenage Dream. 


 Next I have my mood polish from Claire's which you have already seen, it was two for one and I had all the other ones lol. I wish it were more purple on the nail.


Now for some Revlons. I had been lusting after Popular and Whimsical. No need to elaborate, I'm sure you have heard enough about these ones by now. I've already worn and shared Whimsical.


I picked up some more Revlon's at a sale, they were three for $5, from left to right I picked up Decadent, Mistletoe and Royal.


I found this Color Club for a dollar at Sally's! It's called Kiss Me Mistletoe, its a green foil and it smells like evergreens! I also found this bad ass crackle polish at Winners called Great Divide. My photos do not do it justice. I almost wish it was just a regular polish it's so pretty.


Some more China Glaze's, the next few pics look a bit off. I somehow erased some of the photos I had taken so these ones we were re-shot. The lovelies below are Ahoy! and Peachy Keen. I have been wondering about Peachy Keen since it was released on whether I wanted it or not, I thought it would clash with my skintone, but oh my God! It is so perfect! I can't wait to wear this one.


And last, but not least, my new Nfu Oh's!! Actually, more like my first Nfu Oh's. I got these through NailPolishCanada.com and am so happy I did. The two holos don't look like much in the bottle, but swatched they are amazing! I got from left to right, 61, 65, 51 and the Aqua Base coat.


A close up of 51, does not do this polish justice AT ALL!


So that is all for now! This time last year I gave up buying polish for Lent! It was tough, and I ultimately caved at the end... But they were on sale!!

Thursday, March 22, 2012

How Many Blue Jellies Do I Need!?

I have another blue jelly today, but I just couldn't resist picking this one up. I've heard nothing but good things about Revlon's Royal.


This deep blue jelly applied fairy well in two coats. If I had my thinner beside me I would have applied a couple of drops for a thinner final coat. I was distracted again while watching The Apprentice when applying this polish, plus my living room also needs better lighting.


The actual colour is dark, but so saturated with colour it's insane!It really pops especially in sunlight, which we have been having a lot of recently :) I picked out this polish with the intention of using it as a base for layering but once I saw it on my nails I just knew I had to wear it alone, even if only for a couple days.


I topped this off with Seche Vite which added to the super gloss finish jellies like this have.

Wednesday, March 21, 2012

A Magnetic Polish Review + 10% off!

KKCenterHK.com was kind enough to send me some goodies for review. I chose a navy magnetic polish and the three pack of magnetic design strips. The polish colour is named Blue and is a deep, dark blue. surprise right? It remindes me of denim :)


I love how the magnets came. First of all, this is sold as a set of 3, starburst, striped vertical and striped diagonal. They are all held together on this plastic frame which makes it easier to use the magnets.


The formula was thick but quite manageable and the brush was a decent enough size and shape for application. From what I've read you should move fast in your application of the magnetic polish and apply the magnet directly over the nail without touching. The plastic frame makes it easier to hover over the nail as quickly as possible.


The stand that the magnets are packages with also serves as a holder which suspends the magnet directly above the nail, pretty neat!


I find that timing varies to get the desired magnetic pattern. Sometimes I didn't wait long enough and there was little or no effect on the nail, or I kept the magnet on the nail for too long and I just got what looked to be a blob of black :(

Here is my first attempt with each magnetic pattern.

Starburst


Diagonal

Stripes

The diagonal stripes gave me the best design and the magnet was only of the polish for a couple if seconds.

Removal of the polish was a little harder than I expected, It has a weird kind of texture but I guess that has to do with the magnetic particles or something and although I was wearing a base coat it stained my nails a bit during removal :( Another weird thing about the polish, refer to the bottle photo below:


The bottle reads 15mL ... I wish now I had taken a comparison photo between this bottle and lets say a China Glaze or Seche Vite bottle. Seche Vite is labeled as 14mL and still looks to be double the amount of this bottle. That was actually my first thought when I opened the package, wow, this polish is small!

Back on topic now...It's hard to know whether the polish or the magnet are at fault, I would bet the magnets or me not working fast enough, since I did get the diagonal pattern to work pretty good.

Tips for magnetic polish:

- apply the first coat normally to all nails

- apply the second coat individually to each nail while applying the magnet for effect inbetween

- make sure the second coat is thick

- hold the magnet above the nail for 10 seconds, slowly raise the magnet and check the pattern and gauge if more time is needed

What do you think about magnetic polish? Did you have trouble your first time too?

KKCenterHK.com was also generous enough to share a promo code for you guys!


For 10% off use this code at checkout BLGB786EN10


This code is good untill January 31 2013!

*This product was sent to me for an honest review, all views expressed are my own honest option.

Tuesday, March 20, 2012

Belated

*sigh* I feel like I have been so behind on posting. So much is going on lately I feel like I hardly have time for anything anymore, it's always go, go, go! I actually compose most of my posts now on my iphone with the blogger app on the bus ride home from work!

So speaking of many of my posts being late, I have my late festive St. Patrick's day mani. This was also my first ever tape mani :)


I took some tape and placed it diagonally across the nail making sure there were no bubbles. I then swiped a layer of China Glazes Mistletoe Kisses over the nail with slight overlap on the tape. I waited about a minute, added another coat then carefully peeled the tape off. A lot easier than I thought!


I did this to all the nails then used Bundle Monster plate BM03 to stamp some four leaf clovers on my ring fingers and thumbs. The polish I used for stamping was China Glaze's Re-fresh Mint


Pretty festive and fun, even if only for a day. I can see myself trying different tape manis in the future, so easy and fun!

Friday, March 16, 2012

Luck of the Irish

Today I'm sporting a festive green in honor of St. Patrick's day on Saturday. I took a good look through all my greens and decided this was the shade I wanted to wear, the name of the polish wasn't even a factor at the time. This is Orly's Lucky Duck, how fitting!


If you recall I did a Dopplegangers post on this polish here, however now that I am actually wearing it on my nails, I feel like it's the tiny bit lighter than Jade's The New Black. Maybe it's a skintone thing, the last time I wore Jade is the New Black was mid August and I was sporting a tan.


I applied two coats to each nail, the formula was nice and smooth. I love the size of Orly's polishes, but I'm hoping they do something to improve on their brush sometime soon. It's not horrible, but I would prefer something a bit wider. OPI's pro wide is my favorite at the moment.

Wednesday, March 14, 2012

Cotton Candy

Today I have a refresh I did with Revlon's Whimsical. It looked really blah with my skin tone not wearing a base blue, so instead or removing it entirely, I decided to stamp over it.


I used Bundle Monster plate BM-223 and Sally Hansen Insta-Dri Lively Lilac to stamp.


The lavender polish really brought out the grey tones in Whimsical. But for some reason it reminds me of cotton candy lol maybe the pink and blue glitter peaking through? I was happy with the stamping and wore it for almost a week before removal.

Tuesday, March 13, 2012

Whimsical...

Today I have a much sought after polish, Revlon Whimsical. As you probably already know this is also dupe for Deborah Lippmann's Glitter in The Air.


Since my nails are shorter than normal I figured I would build up the polish on it's own without a base colour, I wouldn't wast as much polish on longer nails, right? Four coats later this is what I got:


For some reason this doesn't look so dreamy on my nails alone, it almost looks murky. I regret not using a pale blue base. There are many that come to mind as a great base too, like China Glaze's Sea Spray or $OPI, Havana Nights. I will definitely layer one coat beneath Whimsical the next time I wear it.


Some good points about the polish are it applied well, no real issues. I got some bubbles since I did not let the (four) layers dry fully before application of the next coat. The good thing is you can't really tell, it's like the final coat of Seche Vite froze them in time lol.


Another great thing about this polish is the depth between the layers, I love polishes like this. I don't love it on it's own, but I know I will with a base of light blue. So how do I cope without removal of a fresh new mani? Why stamping if course ;)

Monday, March 12, 2012

Some Moody Polish

Today I have a brand spankin' new polish for my brand spankin' new nubbins lol. I chopped all my nails off and it doesn't really bug me. This is the last polish I purchased to be exact. I picked up Hyper/Relaxed at Claire's over the weekend, they seem to be clearing their mood changing polishes, they are 2 for $5, some are reduced to $2.50. The regular price is $5 USD or $5.75 CAD each. I had been eyeing Hyper/Relaxed, but held back because it was more than I wanted to spend on another mood polish.

cold

In the bottle the colour is a red based purple with a sparkling teal shimmer. On the nail in the cold state I didn't see purple, closer to a blurple if anything, but mostly a royal blue.

cold

Two coats were used for full opacity, although with careful application 1 coat will do. I was distracted while polishing, watching Celebrity Apprentice :). The formula is thick but manageable and dries to a matte finish, so a topcoat is a must!

warm

warm

During the warm state (the two above photos) I found the base changed to a bright teal blue! So pretty. This colour tends to shift based on the lighting source also, different lighting effects how the shimmer looks. The shimmer really brings this polish to life, it adds a lot of dimension.

Wednesday, March 7, 2012

A Sparkly Refresh + BIG NEWS FOR NFU OH LOVERS!!

More glittery nails! Last week I showed you Teenage Dream in it's own, I loved it so much I didn't want to take it off! What to do...


When in doubt, Konad :)


I actually used a dupe plate or fauxnad plate for Konad M77. I call this design the necklace design. I stamped with Konad white special polish, the design came out perfect! I got this plate from the Born Pretty Store, but I find their image plates to be hit or miss, sometimes they work and sometimes not so much :( this one worked great however.


For the thumbs I stamped another design from this plate (you can see this in the first photo above), it has a bow, a heart and some flowers. I added a pink rhinestone to each thumb in the middle of a flower. Loved this! I must do more fun glittery manis like this :D


One last bit of news before I end this post, I just got the word over the weekend that Nfu Oh's are now available to order through NailPolishCanada.com! They are decently priced too considering you get free shipping with any purchase over $29! PLUS you earn polish points towards free polish gifts!

I was lucky enough to be included in a private pre-sale event over the weekend and ordered myself some holos and flakies so I can't wait to try them out, as you can tell I just could not hold in my excitement! I have never seen, let alone tried Nfu Oh's, I hope they arrive soon!