Friday, June 28, 2013

Super Captivated

Happy Friday!! Today is not just any Friday, in Canada it is the start to the long weekend and celebration of Canada Day! I will also be personally celebrating my birthday, also on Canada day :)

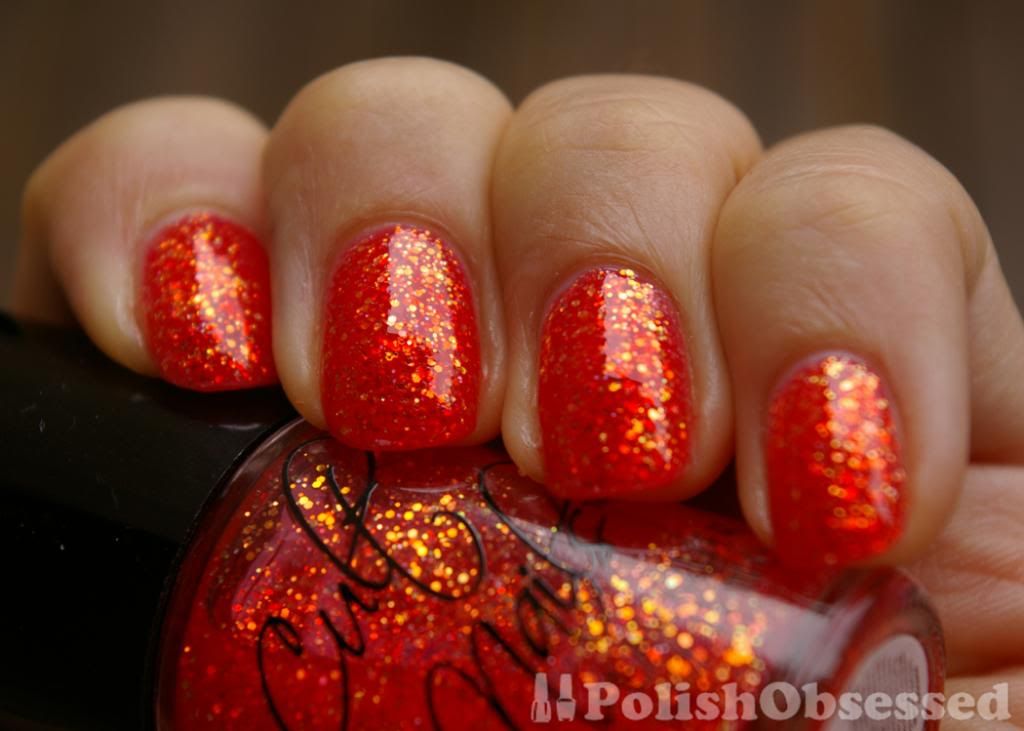
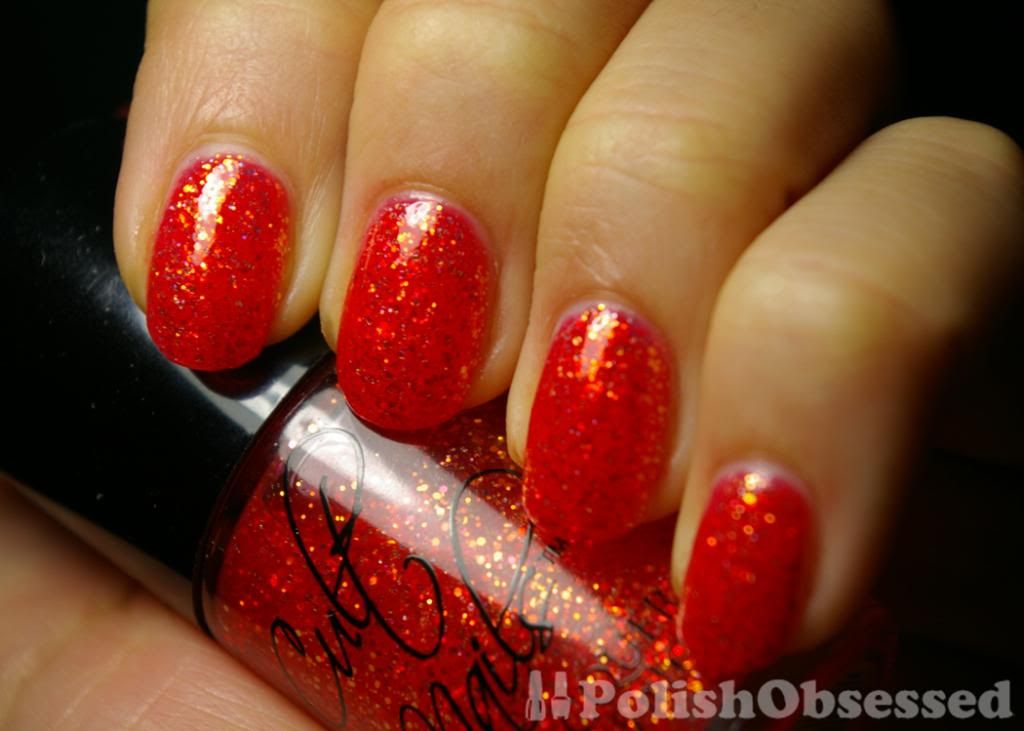
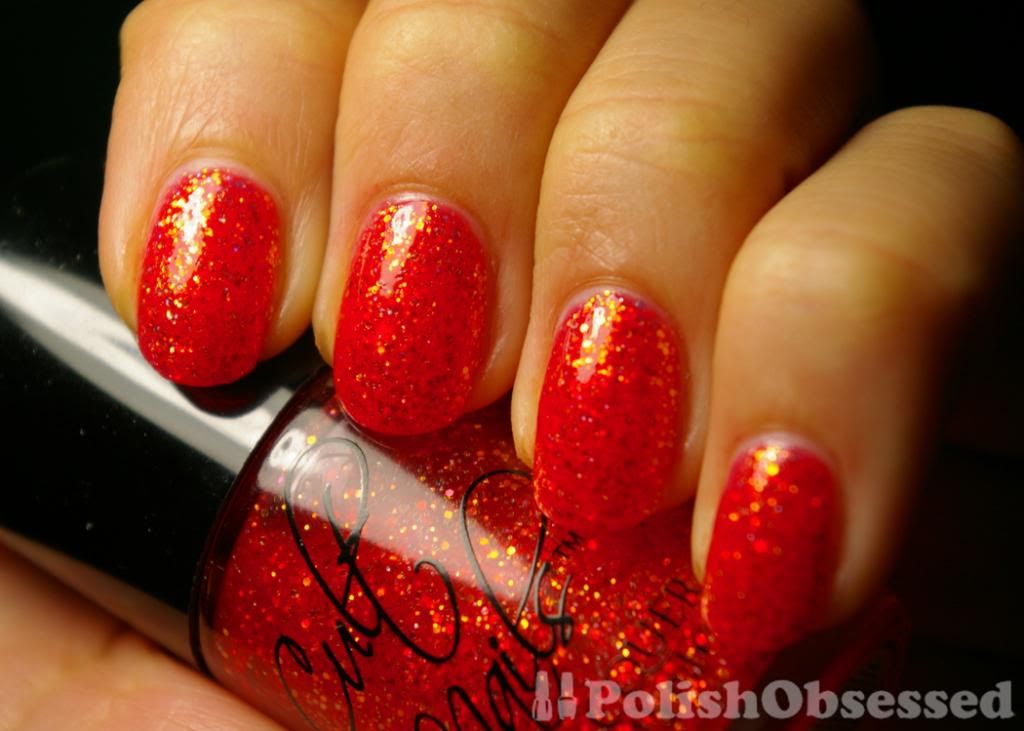
I haven't decided on a birthday mani yet, but today I have a beautiful polish I have put off wearing for too long. I lusted after Captivated when it was first released from Cult Nails and am so happy to have it apart of my collection. The base is a coral, orange/pink jelly and it is jam paced with medium and small iridescent hex glitter. The glitter flashes mostly orange and yellow but if you look real close you can definitely see some blue and green in there. It is absolutely stunning!

 photo IMGP6665_zps91aec06a.jpg

With all that glitter you would think it would leave a bumpy texture but it was pretty smooth with only one layer of top coat. Application was great, I applied three thin coats and as you can see it is perfectly opaque. I did find the formula a little on the thick side so I added some thinner which helped with even application.

 photo IMGP6658_zpsdf880ea8.jpg

 photo IMGP6650_zps44003651.jpg

 photo IMGP6649_zpsdddfae4b.jpg

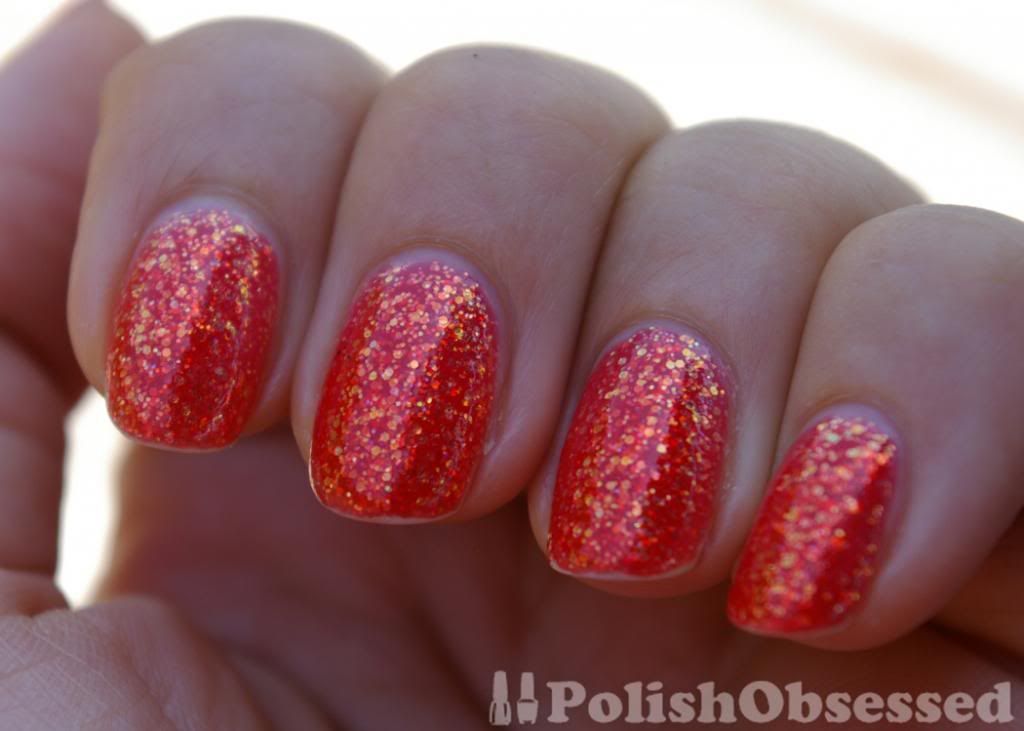
I applied this polish the same day I spent preparing a large dinner for a barbecue, my hands were immersed in water and working away all evening, no chips! Five days later I have only minor tip wear, see for yourself in the photo below.

 photo IMGP6674_zps6cd78c39.jpg

 I absolutely love this polish! I have received many compliments on it so far.

Thursday, June 27, 2013

Cult Nails Swatches

I just realized when I posted my Cult Nails nail mail that I totally forgot to take swatch photos!! I have included them below.

Left to right: Walk of Shame: 2 Coats, Coveted: 2 Coats, Princess: 1 Coat, Scandalous, 2-3 coats

 photo IMGP6666_zpsd60a88b7.jpg

Walk of shame was that extra polish I added to my cart to get the discount, but am just so in love with it. All of these polishes applied great, perfect formula not too thin. not too thick. Scandalous, which is a jelly, applied fantastically and leveled it's self out without leaving any weird brush strokes or bald spots.

Friday, June 21, 2013

A Guest Post from Gina of Polish Nation!

Today I have my first ever guest post from Gina of Polish Nation. She shares with us a redo of a previous mani she created last summer with a China Glaze polish from this years summer collection, have a look at her mani below:

Hello! My name is Gina and I am so happy to be guest posting on Polished Obsessed today! I would like to thank Danielle for being so gracious and kind in letting me "take over" her blog for the day. I am the owner of a nail blog, Polish Nation and I am so excited to share with all of you what I love to do!


 photo GuestPost1_zpse9361b36.jpg

When thinking of what I should do for this guest post I knew I wanted to do something special but also something that I had done before so it didn't not turn into a complete mess. Last summer I did a cloud design on a blue background which I was very proud of. I decided to take that and make it a little more interesting which is what I have to show you all today.


 photo GuestPost4_zpsf9884626.jpg

 photo GuestPost2_zps052810c6.jpg

I started with a coat of China Glaze's Bottoms Up which is from their new Summer Sensational collection. This polish a light pink neon color with I really liked. It was pretty easy to work with considering it was a neon and it was opaque in 3 coats. Then I decided to add a gradient which turned out much more subtle than I had hoped but I still liked the effect. I used the sponging technique and used Essie's Cute as a Button for the darker color. After that I added my clouds using a dotting tool and Superstar! from Pure Ice. These clouds are so easy to achieve and I love adding them to an old manicure to make it look brand new again! Finally I dotted White Cap from China Glaze on top of the clouds to make them pop a little more. 

Once again, I would like to thank Danielle for having me on her blog today and I hope you all liked my post! Please check out my blog  if you want to see more of what you saw today! 

- Gina

Thanks Gina, I am loving China Glaze's Summer collection and cannot wait to get my hands on most of them!

Thursday, June 20, 2013

Flame

The last time I attempted to wear a Claire's polish it didn't go so well, lucky for me Flame, a bright orange neon was a completely different experience. Since the polish is a neon it dries quickly to a matte finish and requires an extra coat or two to achieve opacity. I only used three coats and was happy with the final look.

 photo IMGP6617_zps03af5735.jpg

 photo IMGP6621_zps4228e09c.jpg

This shade of orange is outrageously bright, like one step brighter than a traffic cone! A perfect summer shade. I think I picked this one to get me in to summer mode, the weather has been so up and down lately, it's not really feeling like summer at all. I wish my photos could capture it better, but you know neons and cameras!

 photo IMGP6624_zps1d469178.jpg

 photo IMGP6648_zpse7f2fed1.jpg

I noticed earlier chipping on this polish, but just a small chip/wear at the tips and only on a few nails, nothing too noticeable. I'm thinking of doing a neon gradient with this as the base and another Claire's neon (a pink) sponged on top. I will have to test that out before applying, otherwise I may just do some stamping, haven't done that in a while :)

Wednesday, June 19, 2013

Nail Mail Time...


How adorable is this label? I love Cult Nails for stuff like this!

 photo IMGP6625_zps9463215f.jpg

Their packaging is so great, Maria and her crew really take the time to make each package look special. Unfortunately I was full of excitement and didn't take any photos of the inside of the box before I tore in to it lol. I did manage to take the photo below of the red tissue paper held together by a cult nails sticker which wrapped up my polishes all nice and pretty.

 photo IMGP6627_zps8da6757d.jpg

A little back story on my purchase, I live in Canada which makes it expensive for me to order from Cult Nails. I have been a supporter of the brand and follower of the R3 Daily way before Cult Nails. As much as I wanted to support Maria and her polish venture, the polish was just to expensive with everything was added together with shipping and I had issues in the past shipping to an American address through checkout. Luckily a promo was offered and the sites checkout has been updated, plus shipping is now free in the U.S, so it was the perfect time for me to pick up some long time lemmings ;)

Walk of Shame and Scandalous

 photo IMGP6637_zps01d23707.jpg

Walk of Shame is a gold and holo glitter which is made up of hex, micro and regular glitter. Super glittery, I love it way more than I thought I would!

 photo IMGP6642_zps6c74b866.jpg

Scandalous, a coral jelly which I am in love with!

 photo IMGP6643_zps8de1faa9.jpg

Princess and Coveted

 photo IMGP6631_zps74ba879d.jpg

Princess is a dusty periwinkle leaning blue with a pink/gold shimmer. it was very hard to capture this one properly unfortunately.

 photo IMGP6635_zps232eb3b2.jpg

Coveted is a deep green with medium green shimmer and flake glitter.

 photo IMGP6633_zps9cad2faa.jpg


And finally, Wax That, a wax finish top coat exclusive to Cult Nails.

 photo IMGP6638_zps3785e0ab.jpg

Did you pick up anything during the promo?

Tuesday, June 18, 2013

More Splats!

I loved the splatter accent nails I did so much I decided to create some splatters on the other six fingers as well. I used the same method in my previous post with the same colours, except this time I used one colour per nail and less splattering.

 photo IMGP6612_zpsc34894cb.jpg

I really like this look, it was closer to what I wanted originally for the accent nails, not so blobby ad thick with no topcoat so you can see the matte texture of the base as the gloss finish of the splatter on top. I was tempted to use neons go this but didn't because they tend to dry matte.

 photo IMGP6613_zps36c7a1ea.jpg

 photo IMGP6615_zpsb167f0dc.jpg

I am still planing on trying this again, maybe over white next time. What do you like better, more colour/platter plus a full gloss finish or mixed finishes and a single colour splatter?

Monday, June 17, 2013

Splatter Fun

I was inspired by this post last week to create some neon splatter nails. The mani I was inspired by was not technically the same idea or technique I used but I loved the choice of colour and new it was something I wanted to try.

I made a short attempt to try splatter nails in the past and it was messy. I just tested the technique on a few nails and removed it. To create the platter effect I used a straw cut short. Basically you apply some polish to the end of the straw (some prefer to dip it right in to the bottle, but that is too messy for me), and blow the polish over your nail. Depending on the polish, force of breath and distance from the nail you will get a different splatter design. I chose five colours total to work with:

- Sally Hansen, Blew Me Away
- Sally Hansen, Green With Envy
- China Glaze, Papaya Punch
- China Glaze, Electric Pineapple
- China Glaze, Surreal Appeal

 photo IMGP6603_zps11f98b83.jpg

To avoid a larger mess than I ended up with, I taped off the skin around the nail so any excess splatter could be easily removed when the design was complete.

 photo IMGP6602_zps973fb7eb.jpg

My initial plan was to not add a top coat, I liked the matte texture of Zoya Dovima as a base and the 3-D splatter, but the polish was so thick is some parts that I needed to add a topcoat to help with dry time and smudging. I am happy with the results, but would like to try again without a topcoat.

 photo IMGP6607_zpsd2a40bdf.jpg

I have another plan in the works already for another splatter look for a full mani. A light bulb went off after clean up when I saw the paper towel I was using to cover my table from the excess polish splatter, it looked so cool! So my next attempt will involve DIY "nail art strips" by doing my splattering on a plastic bag and applying over a base colour on my nails. No mess plus it's a lot quicker if you do the splatter the day before to ensure it is dry.

 photo IMGP6610_zpseabc9480.jpg

Have you tried a splatter mani before? What technique did you use?

Saturday, June 15, 2013

Nail Sales!

 I came across a few polish and nail art deals going on this weekend and wanted to share them:

Zoya BOGO
Zoya has a BOGO promo going on until Sunday, buy a polish from this page and get another free! If you purchase four polishes (+ four free) you get free ground shipping! That is $32 for 8 polishes! Check out Zoya's blog for more information.


Born Pretty Store Flash Sale
The Born Pretty Store has a flash sale going on right now for all of their "M" series nail art plates  and vaious nail art items including rhinestones. All items are 99 cents!The grouping of plates are dupes for some Konad designs. Born Pretty Store always has free shipping so this is a great deal! This promo ends Monday June 17th.


Friday, June 14, 2013

Black Matte

Happy Friday! Today I have a darker look considering summer is just around the corner, however, it really is representative of the weather here lately, very rainy. Zoya Dovima is apart of Zoya's Matte Velvet collection release in 2009. I love the frosted bottle and grippy brush handle, it really makes this polish extra special and easy to pick out in a drawer of polish.

 photo IMGP6594_zps2124bf96.jpg

 photo IMGP6595_zps162c6fba.jpg

I had a few issue with application that may have been my fault. First of all I applied this polish with the fan on full blast in my room, I find that usually the extra air always does something weird when I am painting my nails. I applied my first coat a little thick since I was hoping to get the colour opaque in one coat, like most of my other zoya polishes, that was my next mistake! I should have been more patient and applied two thinner coats and allowed some time in between to dry. The thicker I applied the polish to the nail the thicker it became on the brush and nail! So dry time wasn't the shortest, which was disappointing because that is why I chose to wear this polish in the first place! Just one of those days I guess. The end result was okay. I went to bed and got sheet marks to top it all off lol.

 photo IMGP6597_zpsd05a75d2.jpg

The next day I added one last thin coat on top to even everything out and it came out the way I had originally hoped! My photos show three coats, no top coat. As you can see Dovima is a matte/suede grey black, it is a lot softer than other black mattes out there. Is has a silver shimmer that is visible during application, when matte it adds a smokey grey element to the black which softens it up.

Wednesday, June 12, 2013

Mosaic Madness

Today I have a mani refresh with NYX Girls Pistachio. I originally wanted to do some nail art but ended up adding a glitter topper. I used one coat of China Glaze Mosaic Madness.

 photo IMGP6582_zps4bb64106.jpg

 photo IMGP6583_zps8773501a.jpg

Mosaic Madess is so cool! It is made up of bar, hex and micro glitter in matte black and shimmery blue. The formula was awesome, I didn't have to fish around in the bottle to make sure there was glitter on the brush and it applied smoothly. The colour combo of black and blue is my favourite out of the Glitter Glam collection. I am liking this glitter so much I am thinking of picking up the green and periwinkle versions as well. I'm crossing my fingers that these are still on sale at Sallys!

 photo IMGP6589_zpsacc41aab.jpg

 photo IMGP6587_zps0fa0d00e.jpg

The base teal and blue glitters really worked well together. My only complaint about the glitter is that it does soak up top coat, I was left with a gritty feeling on my nails. Whenever I do a mani refresh I use a thinner topcoat so there are not a billion coats to remove later, and it just didn't add the high gloss I would have liked. 

Tuesday, June 11, 2013

A Little Nutty

Today I have a polish from my limited NYX girls collection, I think I own about 3-5. I ordered them a while back off of the Beauty Joint for a great price :) Pistachio, although a lovely shade is not what I expected. The pistachio nut is pretty green, even pistachio gelato is a softer shade but still green. NYX Pistachio is a soft dusty baby blue. I really appreciate the dusty quality, that is what makes it unique in my collection for sure. It would have been nice if there was a hint of green in there though. Oh well.

 photo IMGP6575_zps82d11ae2.jpg

 photo IMGP6578_zps9b46e23a.jpg


I applied two coats in my photos, the first coat was a bit streaky but the formula was great to work with. The second coat covered up any streaking from the first coat. The finished look has the appearance of a jelly even though I would definitely consider it a creme. It has a high finish gloss on its own, but as always I added a topcoat for longer wear and quick dry time.

 photo IMGP6580_zpsb9c2c7fe.jpg

This wore so well, I wore it for almost a full week with only very minor tip wear!

Thursday, June 6, 2013

New Wet 'n Wild Glitters + Which ones I purchased

I was in the States over the weekend and I checked out Rite Aid, which by the way has a lot of polish related promos going on right now. If you buy $30 worth of polish with your Wellness card you get some mega points, plus there are some online coupons on their site for Sally Hansen, L'Oreal and Revlon.

The Rite Aid I have been frequenting particularly never really kept up with the latest polish displays, however this trip surprised me. Not only did they have an abundance of polish displays, I spotted one I have never heard of before! This is Wet n' Wilds Hot Rocks collection.

 photo IMG_0062_zps83c8f6ff.jpg

As you can see the display looked pretty picked over, so I'm not sure if there are any other colours in this collection but I spotted the following:

- Quartz of Course: purple hex glitter with small gold glitter
- Caught on Sapphire: blue hex glitter with a teal/magenta shimmer
- 18K Gold: gold holographic hex and bar glitter
- Emerald the Crown Jewel: green reflective hex glitter with smaller green glitter 
- Rocking Rubies: red hex and regular sized glitter
- Penny For Your Thoughts: orange holo hex glitter with an orange shimmer

The last two I listed, the red and orange are eerily similar to Orly's Glitter FX collection, specifically Blaze (the red glitter, Rocking Rubies) and Penny For Your Thoughts (the orange glitter). The two I picked up were the blue and green, Emerald the Crown Jewel and Caught on Sapphire.

 photo IMGP6566_zps5fba5b34.jpg

 photo IMGP6568_zps2673a854.jpg

 photo IMGP6570_zps21867991.jpg

I almost picked up the gold because it reminded  me of Orly's Sachet My Way, but the bar glitter was too thick for me.  

Both of these polishes are jam packed with glitter and applies really well! I didn't know what to expect, but I am impressed with these so far! My swatches below are two coats each. Blotting was used to help evenly distribute and direct glitter on the nail.

 photo IMGP6573_zps95bed552.jpg

Have you seen these yet? Which is your favourite?

Wednesday, June 5, 2013

Bright and Cheery!

I am not usually a yellow polish wearer but I wanted to wear something different, so here we are! After my Claire's polish disappointment I almost reconsidered wearing yellow at all. I took another look through my stash and found a Color Club I never tried for the Poptastic collection, Almost Famous. This is your basic bright and sunny yellow. I so want to just draw little smiley faces on each nail!

 photo IMGP6556_zps41a7a264.jpg

 photo IMGP6559_zps6ed33145.jpg

I applied two coats of polish to each nail with no issues. Yellow and lighter colours in general are pretty notorious for bad application but Almost Famous applied just fine. As usual I added Seche Vite to aid in drying. I love my yellow nails :D

 photo IMGP6554_zps543f2e93.jpg

 photo IMGP6552_zpse14795b3.jpg

I have never gotten so many compliments on a polish before! Being the nail enthusiast I am, I almost never get compliments in my nail polish/nail art choices out in public, it's great to get a compliment once in a while :)