Showing posts with label holo. Show all posts

Monday, September 12, 2016

Over The Moon!

Summer is still here, and I don't thin it's going anywhere any time soon! Since the sun has been in full force I decided to put on a blindingly gorgeous, bright blue holo.


I purchased Color Club, Over The Moon from a blog sale a while back and this is the first time I have tried it out. I must say, for a linear holo polish, application was fantastic. I forgot to use a special base (usually I use Nfu Oh's Aqua base) and thought I would have problems applying the polish but it was really no big deal. I mean, if I had applied a thicker first coat I would only need one coat. I prefer two so two thin coats it was, and it built up beautifully. 

I typically don't apply a topcoat to holo polishes, however, I tested out my pinky first and it didn't seem to dull the effect, and if it did, I couldn't tell! That being said, the wear of thish shade wth a topcoat is fanominal. Very minimal tip wear with just about a week of wear. 

Thursday, May 5, 2016

OMG! a Holo?

Today I have a unique shade from China Glaze. I wore this quasi-holo polish in late winter, early spring at the first sign of some sunshine. Notice the longer nails!


OMG a UFO from China Glazes 2013 Hologlam collection is a mid toned olive green shade with a slight holographic effect when in the right lighting. Most of the photos I have posted include my camera flash which heightens the holo effect.


The formula applied well over my Nfu-Oh Aqua base, which is what I usually use when applying a holo. I only needed two coats for full opacity and wore it without a top coat to enhance the holo effect.


I enjoyed wearing this but which this collection overall had a stronger holo effect. I wonder if China Glaze will ever attempt another holo collection like this in this future.

Thursday, November 5, 2015

My Own Personal Mirrorball!

I can't believe it's already November, fall has just flown by! Switching things up a bit, I decided to finally wear Orly Mirrorball, a super-lemming of mine last winter. I can't even remember where I found it now. Maybe at Ulta in the States? Anyways, it is gorgeous and I pulled it out for a very special occasion. I won't say what specifically, but I think you'll be able to guess by the end of the post...


Mirrorball is a silver holo with small to medium shaped hex holo glitter scattered throughout. It is sooooo pretty. I used my Nfu-Oh Aqua base and didn't have any issues with application. I love that a little bit of the Aqua base goes a long way too. I believe I applied between 2-3 coats of Mirrorball, however, the polish was perfectly opaque at two coats.


Normally I don't topcoat holos, but I wanted to make sure the polish dried quickly so I added a layer of Seche Vite. It added a gorgeous gloss and I don't think it interrupted the strength of the holo. This is so pretty in the sunlight or in the shade. It may be because it was apart of Orly's 2015 holiday collection, but it reminds me of snow... Which should NOT be happening anytime soon! I may bring it out closer to the holidays again.


Another "mirror-ball" that is sooooo pretty ^_^

Wednesday, April 1, 2015

Cosmic Fate

Holo photo spam ahead!

I haven't worn a holo polish in a while and was feeling springy, so today I have (what I think is) Color club Cosmic Fate. This polish doesn't have a label at the bottom unfortunately, but I am pretty sure it is Cosmic Fate... I hope!


In the bottle the shade appears to be a peachy nude holo, but on the nail it looks more of a peachy pink, more saturated that I originally thought it to me. Maybe it's just my skintone? I am still wearing my Bio Seaweed Gel base, I find that when I have worn this before under a holo polish it really helps the holo to come through more and look glossy without a topcoat. It also makes application a breeze! I don't recall if Color Club's formula for holos is usually difficult, however, I did not need to apply a special (ie. Aqua Base) base polish.


I only needed two medium coats for full opacity and it dried quickly and smoothly as most holos do. What a rainbow effect! So fun and bright. Below is a photo of my rarely seen right hand, in case you can't tell in the photos above, I had a break in my middle nail, of course, just when everything else is growing out perfectly! I figured I should include a photo with a more even length of nails.


I plan on filing my nails down a bit, not to match the break exactly, but to help them look more even. I'll do this after removing the gel base in a few days.

Monday, March 3, 2014

Infra-Red!

To start off my monthly posts of green and purple I have a China Glaze named Infra Red! Technically, it's not really a red, more of a magenta in my opinion. However the holo flash in this polish is a strong blue/purple, hence this is my first purple based polish for March.


 photo IMGP8525_zps878f3ce0.jpg

Infra Red was released last spring apart of China Glaze's Hologlam line. This is the one of the larger collections I was so close to owning all the polishes of, I own all but one. I decided against a pink holo I have a similar polish of. Infra Red is the type of colour I usually d not wear on my nails, I'm not a huge fan of reds or magentas, I wear them every once and a while. It was the strong flash of blue that convinced me to purchase this polish.

 photo IMGP8527_zps6eb64a15.jpg

I applied a thin coat of my Nfu-Oh Aqua Base, so worth the money if you re thinking of picking it up! It made application a breeze. The first coat was quite thick and gave me pretty much full coverage, but since I decided against wering a top coat to enhance the holo effect, I applied a few drops of thinner to the bottle and applied a thin second coat.

 photo IMGP8533_zpsab4ea8d5.jpg

It is true about some of the polishes in this collection not being super holo, but I can still see the effect in different lighting and have accepted it's not like the OMG's. I really did like this collection as a whole though, love every polish I own.

I can't believe how much I have enjoyed wearing Infra Red so far, and it's only been an hour or two! I keep staring at my nails. It must be that blue flash, it is so pretty.


Monday, February 10, 2014

Chrome Blocking

If you recall in my last post I didn't apply topcoat to my Push and Shove stamped mani. I WAS going to add a topcoat after I took the photo, but didn't want to smear anything. A few minutes later and a quick visit to the bathroom and it had almost all flaked off! I highly suggest adding a top coat shortly after stamping Push and Shove in order for the polish to stay on your nails! FYI - I have tested NYC In A New York Minute quick dry topcoat and noticed the slightest dulling of the high chrome shine. Let me know if you know a top coat that does not dull the effect.

 photo IMGP8302_zps747f65ec.jpg

I decided to test out Push and Shove again, this time with colour blocking. I was inspired my Gwen's nails in the promo for OPI's latest colab/collection. I used Zoya Storm as my base (again) and Push and Shove for the colour blocking. I basically applied striping tape to my nails in the shapes I wanted and filled them in carefully and quickly with the chrome polish. Be sure to move fast if you try this out, Push and Shoves dries quickly and you want to remove the tape before it dries.

 photo IMGP8299_zpsf07cd4d4.jpg

I taped off different sections than what was shown on Gwen's nails, I wanted to be a little more abstract with it. The result is pretty fun, a sparkly black base with a mirror chrome sections over top. Application with Push and Shove can be troublesome so I had to move quick with medium, even strokes. I did not apply top coat because I don't intend on wearing this combo for too long, it was more of a test. After the first day of wear I didn't experience any large chips, just slight tip wear.

 photo IMGP8296_zps782ea481.jpg

What do you think of Push and Shove? Any personal tips for flawless application?

Friday, February 7, 2014

Push and Shove - Stamping

Happy Friday!!

After swatching and playing around with OPI Push and Shove, I decided to try some stamping. This polish is starting to become notorious with application issues, will it even work with stamping or will it have the same issues as it does with basic application?

 photo IMGP8280_zpsaf1b5847.jpg

 photo IMGP8281_zps403f7259.jpg

 photo IMGP8283_zps178eeb29.jpg

 photo IMGP8288_zps4c18def6.jpg

 photo IMGP8290_zpsb583b8bf.jpg

Nope, stamps fantastically! I used Bundle Monster Plate BM-422, a honeycomb pattern, and stamped over my previous mani of Zoya Storm. The result was a perfect chrome finished intricate design, just look at that shine! I would recommend moving quick if using Push and Shove to stamp with, it does dry fairly quick. I didn't add a top coat because I didn't want to dull the effect. Pretty cool huh!? Like a space age honey comb!

Tuesday, February 4, 2014

Stormy Weather

I have been so overwhelmed with what polish to wear lately. I think winter is the one season where pretty much any shade or finish go, for me it is overwhelming trying to make a decision! I tend to go for darker shades, nudes, and whites, although I haven't worn too many whites this season. I was so stumped and came across MissHollyBerries latest video of top 10 winter polishes, apparently we share the same colour pallet durring the winter months! She mentioned Zoya Storm, and I thought why not? I had been drooling over this polish since forever but never wore it, so on it went while I watched the rest of her video :)

 photo IMGP8263_zps684ffa48.jpg

Storm is a black jelly-ish base with irregular shaped holo glitter flecks. The glitter pieces appear silver in low light and rainbow blingy in sun and direct lighting. I'm not sure if the base is considered a true jelly, but it sure does dry to a high gloss finish and let the glitter pieces really shine through.

 photo IMGP8267_zps9ffbba10.jpg

Application was a breeze, the first coat went on thin and streaky, but the second coat evened out any minor imperfections and streaking from the first coat. Two coats is all I needed for full opacity. I let it dry for a few minutes before applying my rediscovered, totally awesome top coat, NYC In A New York Minute Quick Dry, Grand Central Station. I love this because it is super thin, applys evenly and dries quickly to a high gloss shine. Did I mention it's only $1.99? Best drug store brand of topcoat EVAR! I just wish they came in larger bottles, oh well, can't be picky!

 photo IMGP8261_zpse2ddf86a.jpg

 photo IMGP8262_zpsbd235c19.jpg

The glitter in Storm when compared to the other Zoya's with the same finish (Aurora, Blaze, Dream) does not appear to be as large which results in slightly less sparkle. Since it has been gloomy the past few days I have only really seen the silver sparkle which comes out, suits the weather well I guess.

Tuesday, January 21, 2014

Silver Platter Princess

When I first saw swatches for Essie's Encrusted Treasures collection is really did not care for it, especially It's namesake polish! Somewhere along the way I began to grow fond of some of the polishes and actually picked a few up. For those of you who don't already know, this is a full collection of "textured" polish. Essie is the only brand I have seen to dedicate a full collection to various types of finishes, meaning they are not all gritty like most brands. At first I didn't get it, but as the polishes started to grow on me it made more sense and made me like the collection even more for being so unique. Not only do they use texture in the feel of the polish, but also in the look. Today I have a polish that has the texture "look", On a Silver Plater.

 photo IMGP8029_zpsffdc0993.jpg

 photo IMGP8031_zps355b338a.jpg

On a Silver Platter is a sheer, but buildable golden shimmer polish densely packed with various hex sized blue holo glitter. The glitter is awesome and what really drew me in! I applied one coat over my previous mani of Cult Nails Princess and it matched perfectly! Although sheer, the prominent golden shimmer distracts from visible nail line if worn on its own.

 photo IMGP8023_zps5e768e2c.jpg

As I mentioned earlier, this is not a gritty textured polish, it actually dries very smooth and shiny on the nail, even without topcoat. The texture lies in the glitter, they add a sequinned effect that really pops against the golden base. I really love the look it gives.

 photo IMGP8026_zps81a9d180.jpg

I must have passed on this polish more than enough times before finally giving in and picking it up. I am super glad I gave this polish a chance, it is very unique in my collection.

Tuesday, January 7, 2014

Twinkling Lights

I am FINALLY back! I have been MIA for waaaaay too long now,  I can't believe it is already the second week of January! I have been constantly busy since the week of Christmas and took the last two weeks of December off. I am not looking forward to going back to work, but we all have to go back at some point, right?

 photo IMGP7948_zps807a8adf.jpg

This week will be my blog catch up week, I'll start off with my awesome Christmas mani! I had a hard time deciding what polish I wanted to wear, I knew I wanted it to be sparkly but also festive. China Glaze Twinkle Lights, was the perfect mix of both! Released apart of China Glaze's Let it Snow 2011 holiday collection, Twinkle Lights is a mix of  predominately gold glitter sprinkled with red and green. I even spy some stray holo glitters in there as well, if the light catches it just right! 

 photo IMGP7938_zps5d45e279.jpg

When I first purchased it in 2011 I probably figured I would use it as a topper, but I decided to try it on it's own to see if it could be built up to opacity.. I love that t is sparkly and gold without being over the top, in your face Christmas. 

 photo IMGP7933_zps80039f1f.jpg

A little backstory on my Christmas manis incase you are new to the blog or forgotten, I have been wearing China Glaze Party Hearty on my nails for 4 years straight in some way or form on my nails. This year  decided I wanted to try something new that would still be as festive as the Christmas in a bottle shade that is Party Hearty. I initially looked to some of the other red and green glitters I owned but they just weren't working for me. When I came accross Twinkling Lights I knew it would be perfect, it would match the gold dress  had in mind for Christmas as well.

 photo IMGP7927_zps00dd770c.jpg

 photo IMGP7922_zps01a940eb.jpg

I only needed two coats for full opacity which was an unexpected surprise. This is probably due to the fact that the glitter is slightly larger (ie. compared to the glitters from the 2013 holiday collection) It applied pretty well considering it was a dense glitter. It had good coverage due to the larger sizes of glitter. Unfortunately it did not last as long as I'd hoped, glitters always tend to wear horribly on me. I am thinking of testing out a few base coats with glitter polishes to see if it helps with adhesion and longevity on the nails. If you have any recommendations for any good base coats to use with glitter polished please let me know!

Friday, December 13, 2013

Zoya Payton

Happy Friday!! Last year Zoya came out with a rockin' holiday collection! I was good last year and only picked out two from the collection of six polishes, of those were these lovely jelly polishes spelled with holo glitter flecks! It was at that point I hoped Zoya would create a collection in an array of shades with the same finish and glitter. Although that has not happened yet, they did release a few more colours with the same finish for this years holiday collection. I showed of Dream in my cross boarder haul, and today I have a full swatch of it's grape sister, Payton.

 photo IMGP7798_zpsb2b3b1d6.jpg

 photo IMGP7809_zps9895765d.jpg

Payton is an inky purple jelly, think of a melting grape Popsicle on a hot day, that is this polish! It is vampy without being black and is peppered with irregularly shaped pieces of holo glitter. The glitter sandwiches between the jelly adds great depth and texture to the super glossy polish.

 photo IMGP7807_zpsf8d1822a.jpg

 photo IMGP7811_zps85320248.jpg

Application was good, I added a tiny bit of thinner for smoother application. I painted on one thin coat and a second thicker one achieving full coverage easily. This shade is so perfect for the holidays without being so in your face. In an office setting it is a good dark neutral, while in brighter lighting you get a dramatic effect due to the glowing holo particles.

Wednesday, November 6, 2013

U.S Hauling

So I went cross boarder shopping over the weekend and spotted a few gems... Ok, so I did more than just spot most of them, I just had to bring some of these home with me! First up, Sunful Colors from Rite Aid, Treasure Chest and Purple Gleam.

Treasure Chest is a teal blue textured polish with gold shimmer. This week I have purchased 5 texture polishes, the first ones of my collection. This looks to be a mix of the China Glaze and Zoya textures from what I saw seen in regards to texture.

 photo IMGP7418_zps0788503a.jpg
natural sunlight

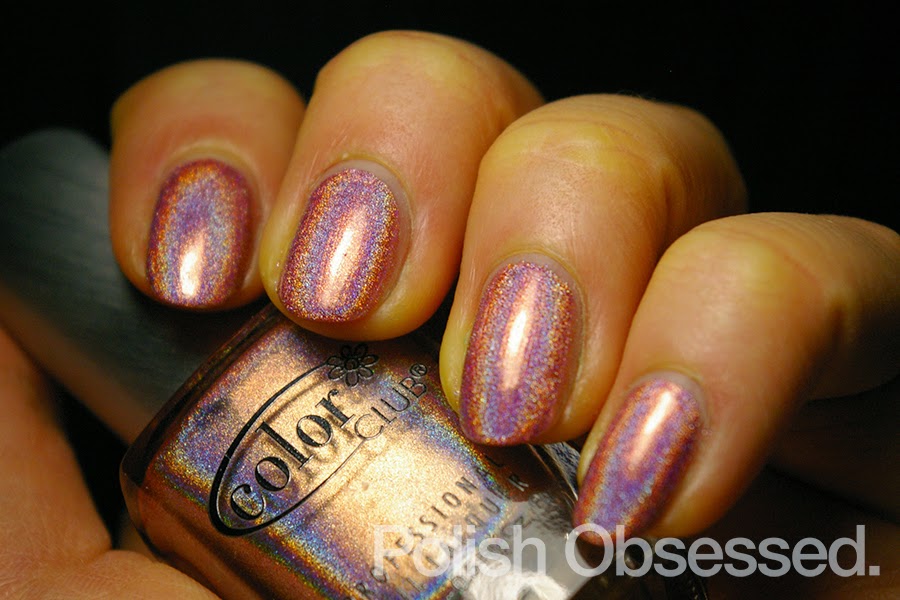
Purple Gleam is a medium purple base with gold shimmer, same texture/formula as Treasure Chest. My swatches show one coat, great formula!

 photo IMGP7407_zps5a58707f.jpg
lamp lighting

I was super excited to find the Christmas collections out at Sally's, it sounds a bit nutso but I'm glad to get my hands on the polishes I want early so I don't have to search for them later. I picked up four China Glaze polishes,

This Is Tree-Mendous and All Wrapped Up.

 photo IMGP7451_zps44460149.jpg

Tremendous is a grass/gold green glitter, it appears to be in a clear base. This glitter applied well, two coats are shown in my swatches with no topcoat. 

All Wrapped Up is a purple based blue glitter in a slightly tinted base of the same shade. This glitter also applied well, two coats without topcoat are shown in my swatches below.

 photo IMGP7402_zps54218b1e.jpg

Bells Will Be Blinging and Your Present Required.

 photo IMGP7450_zps78446a5f.jpg

Bells Will Be Blinging was my favorite out of the whole collection when I first saw the press photos. It is comprised of various sized/shaped blue, shiver gold and holo glitter in a clear base. I had anticipated it to be a brighter blue, however it is still very pretty. Two thick coats with no topcoat is shown.

Your Present Required is a glitterbomb! Another very unique polish, is is comprised of hex glitter in various sizes of mainly purple, blue, gold, copper, silver and matte white. I also see a few specks of green hidden in the bottle. The matte white glitter remindes me of snow :) One coat is shown, I liked this one a lot more than I thought I would. I can't wait to try some jelly sandwiches with this one!

 photo IMGP7399_zpsdc449b98.jpg

 photo IMGP7426_zps89f8cd24.jpg

I picked out one Orly, my first since the redesign, Lavish Bash. This is another glitter, big surprise right? It is made up of gold, silver and holo glitter of various shapes and sizes including bar, hex and micro. Very Sparkly! Two coats is shown in my swatch with no topcoat.

 photo IMGP7452_zpsced7bbf2.jpg

 photo IMGP7392_zps40246189.jpg

Next stop, The Christmas Tree Store. This place has the most random grouping of items, but I was lucky enough to find a long sought after Milani and Sally Hansen Magnetic.

 photo IMGP7454_zpsdff10685.jpg

Milani Cyberspace , is a sky blue scattered holo. I picked this up for $1! Three swatches are shown below, the formula is thin but buildable.

Sally Hansen Silver Elements, I'm not a huge fan of  magnetic polishes in general, I can never seem to get them to work properly lol. I did like the shade of the polish in the bottle on its own. It appears to be a blue/pink duochrome with duochrome glitter in a silver, chrome-like base. My swatch shows two coats, with no magnetic effect. I picked this up for $2!

 photo IMGP7397_zpsc4ca93b6.jpg

 photo IMGP7428_zpsf9bddea9.jpg

Last stop, Marshalls. I spotted a few double packs of OPI's, mostly from the first Mariah Carry collaboration. My pack was Get Your Number and Can't Let Go. I seriously love these! I'm actually surprised I did. This particular pack looked to come with a gift of some sort, but I isn't realize until I got home that it was removed or stolen. For $7.99 you still cannot go wrong! If you know what gift came with this pack, let me know :)

 photo IMGP7480_zpsf9699617.jpg

Get Your Number is a jelly blue polish with loads of holo glitter. When dry this reminds me of some sort of blue raspberry sour candy! Super awesome. Two coats are shown in my swatch.

Can't Let Go is a purple "liquid sand" polish with some hex glitter thrown in the mix. No holo, sparkly glitter in this one, two coats are shown in my swatches.

 photo IMGP7406_zps01351228.jpg

 photo IMGP7417_zps80545651.jpg

So that wraps it up! Lots of polish for me this last month, I have another huge haul post coming up soon from Cherry Cultures 40% off sale.