Friday, October 29, 2010

Halloween mani, ideas and my first water mani :)

Hey ladies,

Today I have a Halloween mani and some other Halloween nail art designs and ideas :)

I decided to do a water marble a couple of days ago, I had attempted one a couple of weeks ago on an old mani before changing it, it was a lot easier than I had thought. I decidd to go with traditional orange, black, and white for my Halloween themed marble. The colours I used include:

Sally Hanson - White Ghost (Base)
Sally Hanson - Black Out
Color Club - Tangerine Scream
Color Club - Wham! Pow!
Sally Hanson - Silver Slingalade (mini holigraphic sparkle topcoat)


click photo for hi-res version and to enlarge :)

I like how each nail came out different, when I created the marble design I wanted it to be random and I was pretty happy with the final result (although I preferred how the design came out on my left hand better, this is pictured)

I will definitely be trying this out again in the future, I can already picture a Christmas or Valentine themed one :)

Below I have some other Halloween nail art/designs I came up with:


I used a white base and a purple BM Swirly/circle stamp to create an abstract eyeball look :) I completed this look with some dots in the middle of some circles and a topcoat of a file holigraphic glitter.


This next one looks a little messy because I didn't use Konad black for stmaping. I was originally trying to freehand a candy corn design but wanted to see how a stamp looked over top. I used a BM plate fo this design aswell.


This one is my fave, I would wear this just as the accent nail on a full mani of this colour (color club - pucci-licious) I freehanded the stripes with a thin striper brush and topped it off with a subtle multi-sized glitter.


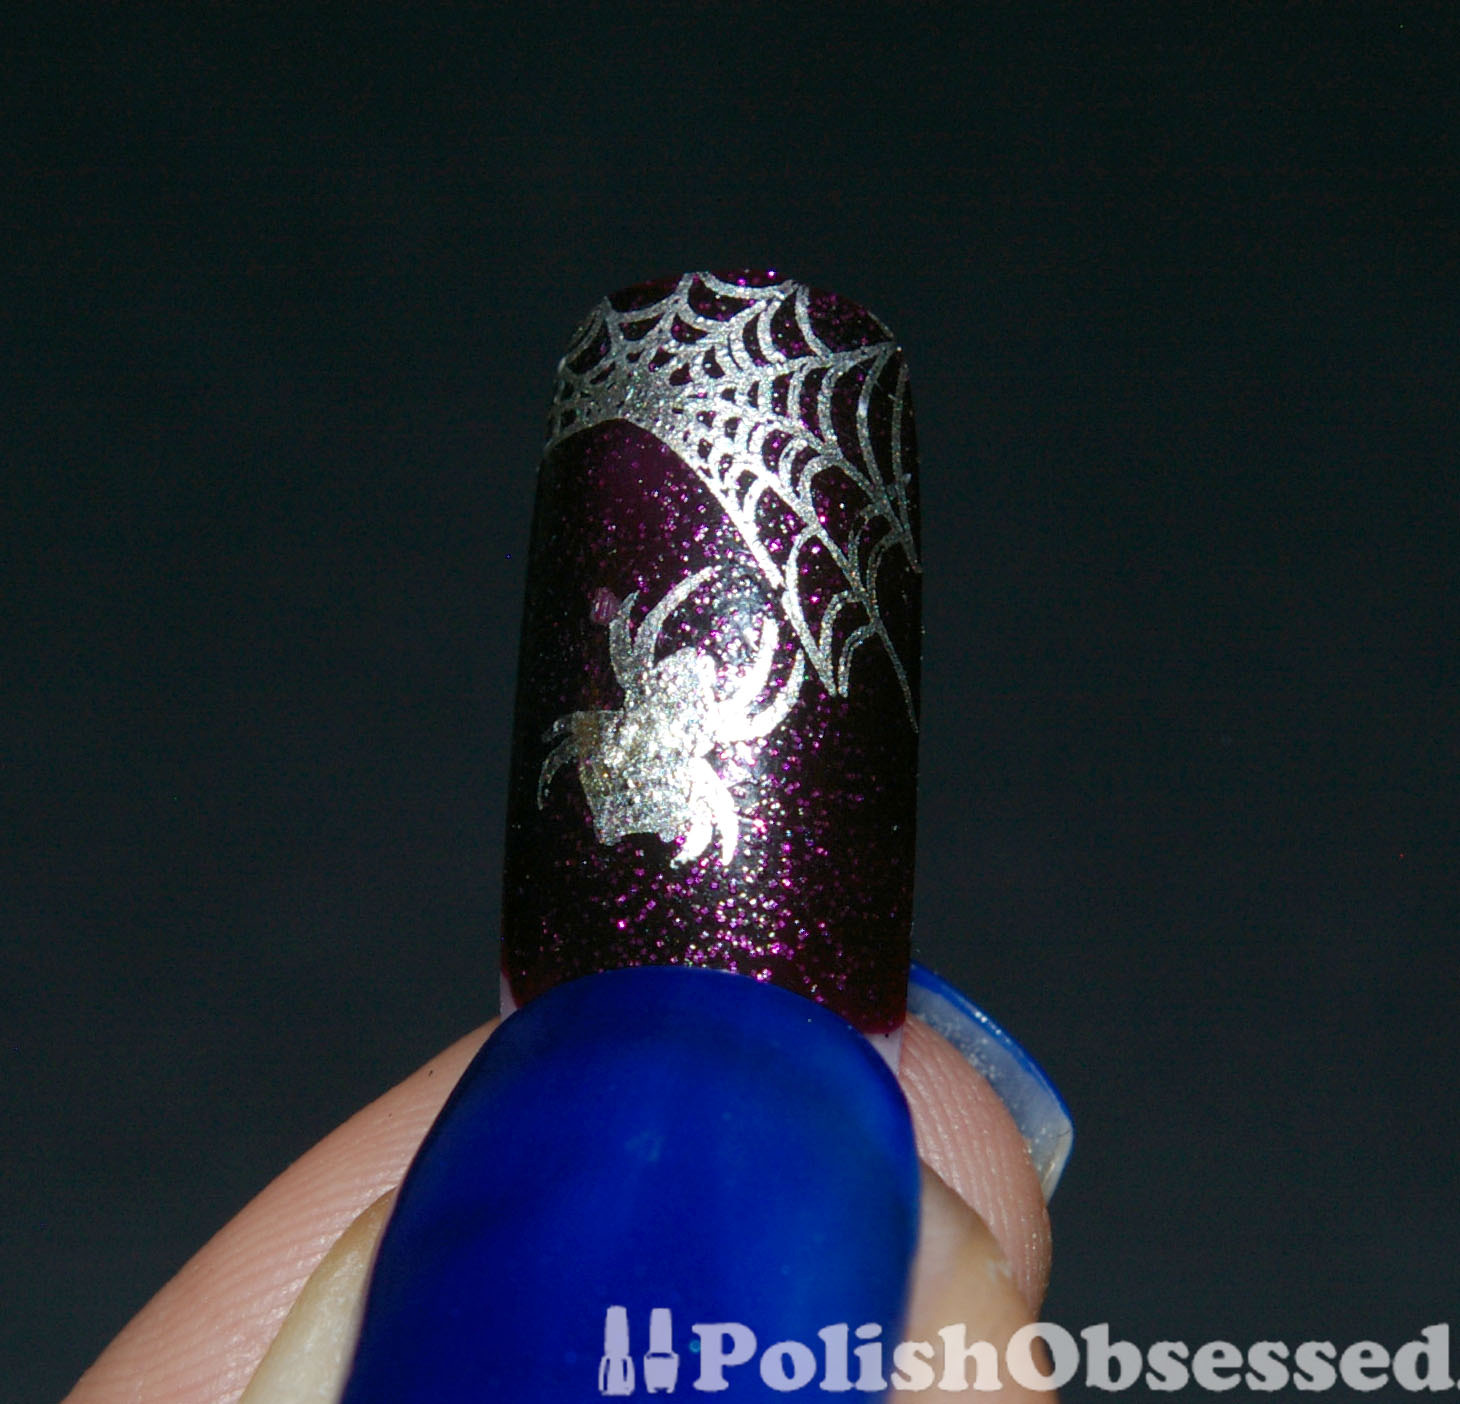
For this last design I actually prefer it without the spider. I am actually considering replicating this one for halloween if I have some time on the weekend. I used a base coat of a deep burgandy and layerd ot over Wet and Wild - Night Prowel. I then stamped with my BM spider web pattern/spider with a Sally Hansen Chrome.

So what do you think ladies, anything you like? What with your Halloween mani be?

Thursday, October 28, 2010

Space Nails

Hello ladies,

Today I have THE colour of fall, it is just so perfect and fall! Originally when I saw swatches for Orly's Cosmic FX line Space Cadet didn't really do anything for me, not my colour I thought.

After seeing pictures of this beauty on other blogs I knew I wanted it. I actually came across these before they were supposed to be released at a Sally's in Buffalo. I spotted them in the back of the store at the end of August but I thought that $8.99 was too much when I brought them up to pay so I left them. I was soooo kicking myself a month later when these were nowhere to be seen!

When I couldn't find Space Cadet anywhere and saw MORE photos I knew I HAD TO HAVE IT! I was going nuts trying to find it! I finally found the full collection online (M Beauty Lounge) for a $6.75 and they shipped to Canada! SCORE!! By awesome boyfriend got me Space Cadet, Galaxy Girl and Out of this world (I have the dupes for the other 3)

Anyways, on to my many photos :)

I used 2 coats of Space Cadet over I coat of black. Please enlarge the photos for all the sparkly, foily, flakie, duochromy goodness, the photos are huge! :)


looks so cool in the bottle, 2 shots here to show you all the colours in the polish.


In the light I saw more of a copper/gold colour.

Align Center

I love you you can see so many different colours at once, I didn't get bored of this polish at all!


The base is green but when I wore it I hardly saw green. In low light I got a purple/pink foil.


I dont think there is anything else to say, enjoy the photos :)


On a side note, has anyone ever ordered from M Beauty Lounge before? Have you ever heard of it?

Wednesday, October 27, 2010

Nailene Bedazzled Nail Art - Review

Hey ladies,

I have some awesome nail stickers to share with you that were sent to be from Nailene. This set of Bedazzled Nail art is there Earth Angel collection which is a great assortment of over 100 stickers which include hearts, stars, flowers and more. I also really like the different styles of stickers this pack includes; rhinestones, 3-d, and regular flat.


My previous experience with Nailene's stickers have been great, they apply great and don't budge. Usually they don't even look like stickers, they blend well once a topcoat is added to seal them in. I used Nailene Acrylic Strong topcoat, which added high gloss and sealed in the sticker perfectly.

The stickers I decided to use were the 3-D ones, they look like little metal droplets :)
Unfortunately I did have some minor issues with these stickers.

- Stiffness - these stickers tend to be thicker and stiffer than the original ones, this can make them not as flexible to bend to the shape of your nail bed. Also be very careful when peeling off of the backing, I used my tweezers and it was so stiff it flew up from the tension and I lost it!

- variety (reflection) I used these stickers on my ring fingers so naturally I would want to use the reflecting pattern on the other for a matching look. Unfortunately, the design I chose only came in one design, no reflections.
*note* for most of the other stickers included in this pack, this was not the problem.


click to enlarge :)

Although these were minor issues I still love the look and wear on these bumpy little guys! (which, by the way, are not even all that bumpy!) After a couple of days I did see notice wear on the middle of the circles, but this has been from regular activities I do throughout the day (there is a little black dot in the middle of some of the 3-d circles.)

click to enlarge :)

My overall opinion on these stickers is still love despite my minor issues. Who can deny little metal droplets on your nails!

What do you think about these stickers? What do you think of the polish ;) Think you guys can guess what it is? Full review of this polish with MANY photos to come soon :)

*this product was sent to me for review, all views expressed are my own.

Tuesday, October 26, 2010

Glitter Topcoats Comparison

Hey Ladies,

You are probably sick of this mani, but I promise, this is the last time you will see it! lol

Today I have a glitter topcoat comparison.

click to enlarge and see the blue/pink flash on laser

From left to right excluding the yellow polish:
Saly Hanson HD - Laser (bottle pictured), $OPI - Only Gold for me, NYC - White Lights Glitter
Also, on my other hand I used Sally Hansen Xtreme Wear - Shooting star.

In the above photo please enlarge to see how Laser looks over Royal Navy. It enhances the shimmer that is already present and ads a slight duochrome shine. I only used 1 coat here, If I had used another the pink shimmer would be more visible.


Next is NYC, this one really sparkled over the blue. The glitter in this polish is translucent but flashes between blue gren and yellow the most.


Shooting Star - This glitter is a mix of smaller translucent glitter and larger silver glitter. I thought this would be the same as the NYC but they are very different in real life, the silver glitter sets it appart.

please enlarge to see the layered goodness :)

Lastly I have $OPI, I love this topcoat :) I swiped one layer of this glitter over the blue and then added another coat of Royal Navy on top. Since the polish is a jelly you can see the glitter under. I love this look, reminds me of Accross the Universe.

What's your favorite layering polish?

Monday, October 25, 2010

Nailene Acrylic Stong Topcoat Review, part 2

Hey ladies :)

Here are my results from testing out my new Nailene Acrylic Strong Topcoat.

The picture below is from Monday when I first applied my polish. * remember - I only applied the topcoat to the blue polish*


The next picture I tok on Wednesday, still looks pretty good, no tip wear yet.


The last picture was taken on Friday before removing the polish. You can see some slight tipwear on my middle finger.


Overall wear of this topcoat was great. For as long as I wore my mani I did not experience any chipping or pealing. Regular activities I do with my hands on a daily basis include washing dishes, preparing small meals, and a lot of typing at work. I really like the formula, it is nice and thin and applies evenly and in my opinion dries pretty fast (not a speed dry top coat by any means, but it dries fast enough for me)

I am wearing this topcoat on my current mani and think it will be my go to to topcoat from now on :)

* this product was sent to me for review, all views expressed are my own.

Thursday, October 21, 2010

Not Your Average Halloween Mani

Hey Ladies,

I have had so many ideas for Halloween mani's but have hardly done any! I will have a post coming up soon showing the designs I have come up with for Halloween. Like I said, I have had so many ideas, but it seems like all of us bloggers think alike! Candy corn, pumpkins, orange and black. I've seen some awesome Halloween ideas but I don't want to repeat what others have already done and give you some inspiration and new ideas for your own Halloween mani.


click to enlarge :)

For this look I used:
China Glaze- Base coat
Orly - Royal Navy
Color Club - Almost Famous
Color Club - Wild at Heart (for stamping)
Cover Girl - Pink Twinkle (top coat over Almost Famous)
Nailene Acrylic Strong Topcoat (only over Royal Navy)
Bundle Monster Plate - BM02

This look is pure tick-or-treat! I was originally going to use purple instead of blue, but I wanted something a little non-traditional Halloween.

Application
Royal Navy - I applied 2 decent coats of this jelly and was very happy with coverage :)
NOTE - in the photos the colour looks a lot more sheer than in real life, the colour is actually very pigmented.

Almost Famous - I applied 2 coats f this one also, and was surprised with the coverage of 2 coats for a yellow polish! The first coat was weird though, it looks like the pigments were streaking a bit. Next time I'll have to give it a good shake before applying.


click to enlarge :)

Colour
Royal Navy - Beautiful Jelly with turquoise shimmer. This may be a good or bad thing depending on how you look at it, but you really gotta shake this one up to get the shimmer to be visible. I would say the shimmer you see on my nails is a result of not shaking it enough. In a way you can control the amount of shimmer you want to achieve.

Almost Famous - I was expecting a neon yellow since this came from the Poptastic collection, but surprisingly this one is not neon at all, it even had a slight orange undertone. I like this better than a neon in my own opinion.


click to enlarge :)

Wear
These polishes so far have worn very well, this mani is my test for the Nailene Acrylic Top Coat (which is over only Royal Navy) More to come on wear in an upcoming post (Part 2 of my Nailene review)

Final Thought
I kind of want to know what you think of this mani! Halloween enough? I'm sure you can change up the colours and make your own version if you want :)

Tuesday, October 19, 2010

Nailene Acrylic Strong Topcoat - Review, part 1

Hey Ladies,

Today I have a product review from Nailene.

What the product claims:

* locks in colour while adding high gloss shine
* provides extra protection for stronger natural nails
* Formaldehyde free


Click to enlarge!


In this first part of the review I will be showcasing the high gloss shine. I used one coat over my Zombie Zest Mani (which I previously wore no topcoat with). It instantly added a high gloss shine and smooth finish I was really impressed with. I mean, just look at the pictures below! such a glossy zombie ;)


Click to enlarge!


Click to enlarge!

Application
The topcoat applied smoothly and evenly with no cuticle pull or stickiness/stiffness. The brush was average and the actual polish was quite thin which I like. Overall dry time didn't take too long, maybe a couple of minutes. (FYI - I applied this to dry polish)


Click to enlarge!

Final Thought
This topcoat definitely provides my polish with a high gloss shine and smooth finish. Please take a look at my previous post to compare the mani with and without the topcoat, you can definitely see a difference.
Stay tuned for the second part of the review to come soon where I test the wear and durability of the topcoat.

* this product was sent to me for review, all views expressed are my own.

Monday, October 18, 2010

Blackened Zombie

Hi ladies,

Today I have China Glaze - Zombie Zest over Sally Hansen Xtreme Wear - Black Out. I applied one coat of Black Out and 2 coats of Zombie Zest.

Click to enlarge

Application
Sally Hansen, Black Out - this polish applied smoothly and opaque in one coat. I like how you can control the opaqueness on this one. I applied one thick coat and it was dark enough for me to apply the next polish on top without being too translucent. You can also build this up with 2 thinner coats.

Click to enlarge

China Glaze, Zombie Zest - I love this polish! Although I didn't try it alone, I would estimate needed 3 to 4 coats to get this fully opaque. This is a jelly-ish formula with duo-chrome flecks applied well and dried quickly in between coats.

Click to enlarge

Colour
I would say the coloured flecks change between, olive green, gold/yellow and turquoise. The base colour is a yelly olive green. Zombie Zest is so awesome! It's a dupe for Orly Cosmics Collection's It's Not Rocket Science which are also duo-chromed flecked polishes. Indoors and direct sunlight you get a shimmery look, but in the natural daylight and shade, wow, every little fleck is so pretty over black and the multicolored flecks really shine.


with camera flash


wish sunlight


natural daylight - close up

Wear
So far I have worn this colour for 6 days with no topcoat, pretty impressive! I experienced minor tip wear on my typing fingers. Today I have started to see some slight chips on my thumbs, this is usually where I start to get chips first.

Final Thought
Overall I love these colours together, I think the black really makes the duo-chrome in Zombie Zest show more than if I were to build it up on it's own. I love this colour so much I have been wearing it for almost a full week! I wish that the other 2 polishes in the Halloween collection were flecked also.


Click to enlarge

Over all Rating - Zombie Zest
Application: 4.5/5
Colour: 5/5
Wear: 5/5

Which colour is your favorite from China Glaze's Awakening Collection?

Friday, October 15, 2010

Nail mail

Hey Ladies,

I hope you are still with me! I have been crazy busy this week, I hope to get back to my regular posting schedule on Monday, I'll be getting posts ready for next week over the weekend.

It figures that the week I'm super busy I get the most nail mail! Today I have some samples from Viva La Nails and more products from Nailene.

Below are my new nail stickers! Very pretty and floral.


Next are my water decals, very vibrant and pretty, I got some flowers (colour & black and white) and butterflies :)


Next a sequins, If thats the right word for them. They are glittery and pretty, from left to right top to bottom I have: blue opalescent shells, teal circle outline sequins, opalescent and transparent hearts and black moons. The moons are the coolest! they flash red green and blue!


More sparklies! they look like they are on fire they sparkle so much. Left to right, to to bottom, yellow bar glitter , silver pieces of glitter, red pieces of glitter (all of them flash all the colors of the rainbow!) and pink circle glitter.

Below are the latest products I have received from Nailene. These items include the Acrylic Strong topcoat, Bedazzle (Earth Angel) Nail Art and Couture Runway Design False nails.

I have been wanted to try out the Acrylic strong topcoat for so long, will definitely use this on my next mani. The earth angel stickers have these cool metal looking droplets that literally look like melted metal, they are sooo awesome!

I look so forward to trying and playing around with these new products! Have a great weekend :)

Wednesday, October 13, 2010

Thankgiving Half Moon

Hi ladies,

*note - super busy today, I had thought I pushed publish last night for this to upload automatically, but I did not. Sorry for the late post, hope you enjoy!*

Today I have a half moon mani attempt for you! My sister asked me to give her a half moon mani in black and white, I thought great, I can get some practice! And after a couple days of her wearing it, I couldn't help but want to create my own :)

What I had planned on doing was using one coat of Color Club - Oh Naturale and a coat or 2 on top of OPI's Ginger Bells for a Thankgiving/fall half moon :)

What ended up happening was a mess... I used reinforcement stickers as a guide for the half moon apparently too soon (some of the polish pulled up) and all of moons were left uneven :( This may have been due to the fact that I had my whole family coming over within half an hour for dinner and was in a rush!


What I ended up doing was taking everything off and painting 2 coats of Ginger Bells and leaving it like that for the night. The next day I took a striper brush and filled in the half moon with Oh Naturale lol. Definitely not ideal, but it worked! I sealed it all in with thin topcoat and this was the final product.


I think I definitely want to try the half moon mani again (the proper way) free hand. I feel like I would have more control of the final moon and it would be easier to get all nails consistent.

What do you ladies think? Can you tell I painted the half moon on top?

Tuesday, October 12, 2010

Oh Naturale

Hi ladies,

Today I have a polish from one of the Winners Color Club collection packs I purchased recently, Oh Naturale.


This colour is a peachy/orange jelly and I used 1 coat on my nails in these photos. The reason for the 1 coat was because I wanted to attempt a half moon mani with this and another colour, but more on that tomorrow.


Over all one coat was alright, I have visible nail line but for one coat of a jelly, it produced decent coverage overall.


I did have some issues with this polish. Some of the spots I went over a little thicker with polish took a lot longer than I thought to dry (which is not good when you want to stick nail guides on the polish!)

In retrospect, I should have painted my nails earlier in the day with this colour and did the half moon closer to the end. Unfortunately I was limited for time, helping out with Thanksgiving and making mini pumpkin spice cupcakes :)

Oh well, I will let you guys see how my half moon turned out tomorrow.

What do you think of this jelly? Decent coverage for 1 coat?

Friday, October 8, 2010

A Subtle Halloween Look

Hey Ladies,

Today I have another Halloween inspired mani, this time its a little more subtle and wearable this early in October lol

I used Colour Club's Pucci-licious for the French chevron tips and a black Sally Hansen with a striper brush for the swipes.

click to enlarge!

I really love this colour! This and Twiggy were my reason for buying the Poptastic collection, they are so great :)

To make this look a little halloween, I added a subtle chrome spider to my ring fingers with a Sally Hansen Chrome polish and finished it off with an orange rhinestone. I really love this look and have been wearing it for 3 days now.

The best thing about the look is that you can change up the colours and stamp/design choice to make it appropriate for many different occasions or themes.

click to enlarge!

I got some inspiration for the colours in the mani from Tim Burton's Nightmare Before Christmas, one of my all time favorite movies! I remmber seeing it in the theater as a kid :)

Just so we are clear though, this is not a Halloween movie, It is a Christmas movie! I took inspiration from Halloween town :)

Anyways, Have a great weekend! Here in Canada this weekend is the Thanksgiving long weekend and Monday is also my dad's Birthday so I may not post then. I will have to see how how the day goes, but If I don't post, I will on Tuesday.

Happy Thanksgiving for those celebrating it :)

Thursday, October 7, 2010

A Weeks Worth of Hauls

Hello Ladies,

Today I have a post showcasing some polish purchases I made last week. Over all I got some great deals and great polishes :)

Lets start with the polishes I got at Winners. The first is the Color Club Wild At Heart Collection, wow, I am in looooove with this one! I had only owned 1 Color Club before I purchased these sets, partly because they are not readily available and when I do find them they are costly. Their formula is soo great! most of these are 1 coaters and halos!! omg, pure love :) this collection consist of (in order from left to right in the photo below):

- love 'em, leave 'em
- wild and willing
- on the wild side
- rule breaker
- wild at heart
- with abandon
- top coat
Please click all photos to view larger, but especially this one for the shimmer :)
$12.99 for the pack

Looove this collection, the colours are so awesome! I used wild at heart for the spiders in my past Halloween inspired mani.

$12.99 for the pack

Next is the Pardon my French Collection, this consists of:
- pardon my french
- i believe in amour
- hot couture
- au naturale
- turn the other chic
- take me to your chateau
- si vous please!

I only got this collection for take me to your chateau, au naturale and pardon my french.


$12.99 for the pack

Next collection is popstastic! This consists of:
- almost famous
- wham pow!
- poptastic
- warhol
-pucci-licious
- twiggie
-chelsea girl

I got this one for pucci-licious and twiggie, but the other colours surprised me, very nice :) I got rid of 2 though, the pink ones (poptastic and warhol), I have way too many pinks.

I also saw 2 other collections that didn't interest me, Untamed Luxury (Every Shade of Indulgence) and Glitter Vixen. For $12.99 I was ecstatic to get these collections :)

In the Halloween section of the store I also saw their mini Halloween pack. The colours were not exciting enough for me and they cost $8.99 for 4 minis!!

Last weekend I also stopped by American Apparel. I heard somewhere that they are not making polish anymore? Has anyone else heard this? If it's true, I suggest stocking up, the formula is great.

3 for $18

I picked up Pinto, Summer Peach and L'esprit. I got Pinto because I had seen an OPI the other day I really liked (Ginger Bells) and thought this would be a good substitution. Luckily (or unluckily deepening on how you look at it), I found Ginger Bells on sale literally 5 min after I purchased this! I regret not getting factory grey instead :( oh well, next time.


$5.00 each

These OPI's i piecked up for $5 each, the left one is Ginger Bells, I forget what the other ones is called ... oops!( I will update when I get home) The colour is totally off for this unknown polish, it is ore of Pinto with a slight red undertone.


Here I have them side by side, as you can see they are very close, closer than I thought Ginger Bells would be!

$1.00 each

I also stopped by Dollarama and found these in the scrap-booking section! I love them and have already used some :) I got multi-coloured small circular rhinestones and silver multi-shaped rhinestones. I figure I can paint over them with a different colour if I want :)

So that is all for now. Have any of you found any great deals lately?