Showing posts with label tutorial. Show all posts

Friday, August 7, 2015

Healing A Broken Nail - Tutorial

Today I have part three of a four part series reviewing the products I was sent for review from Bio Seaweed Gel. Since the gel polishes they supplied me with do not require a top coat on the toes, I decided to try their No-Wipe Top Coat for another purpose, a broken nail.

It was a split second mistake that almost ripped off the free edge of my middle nail! I patiently waited all day to mend the hanging nail. It happened on the way in to the office. As soon as I got home I went to work on the nail!

What I used:
  • polish remover
  • super glue (or nail glue)
  • strip cut from tea bag
  • Bio Seaweed Gel No-Wipe Top Coat.
I carefully removed the polish from the nail. Once the nail was bare, I lifted the broken nail upwards and applied a small drop of glue. I then pressed the two pieces of the nail back together and held in place (make sure there is no glue on your fingers).

Once that dried, I added another few drops of glue to the nail and applied the tea bag strip. I made sure to fully cover beyond the break, but not the full nail. Make sure the strip fully adheres to the nail and absorbs the glue.


Once that had dried, I filled away and buffed out the excess strip (shown above) and made the nail as smooth as I could. This is when I applied my UV gel top coat and cured. I used two coats for added protection (shown below).


The thing I like best about this gel top coat is that it does not produce a sticky layer which needs to be removed for the polish to shine. Less work and time spent on gels is always awesome!

This has been wearing great for me and really fused the broken nail back together. In the past I have just glued a fake nail on the broken one and waited for the nail to grow back in, but this looks and feels way more natural and I get to keep my nail and length without chopping down the rest!

Do you have any tips for nail breaks? What do you usually do?

*This product was sent to me for an honest review, all views expressed are my own honest option. 

Wednesday, September 12, 2012

My Little Glue Experiment

Today I have a review for the method I used earlier in the week to create a base coat that peels of easily when you want to change your mani. For more on that post click here, for more info on the method I used watch this video.

So here we go, the first photo was taken right after application.


The next photo is after the first full day of wear.

Midday I noticed a small chip on my pointer finger on the top left side. This was on my left hand only, my right hand did not experience any chipping. After my shower that evening I also noticed that the middle finger had slight lifting at the base, must have been the hot water. It did not peel off.


Day 2

I noticed some minor tip wear on both hands, it's hardly viable and not really abnormal. I also got some tiny chips on my thumbs. This is where I usually get my chipping first no matter the finish or type of polish. Still very minor. After my shower this day I did not get see or feel anymore peeling.


Day 3

I had slightly more chipping on my thumbs. A bit of the polish pulled up which was annoying.


But the rest of my nails looked fine :)


Day 4, Time to peel it off!


This is such a great idea, not only is the removal process much easier, but it also saves a bunch of time. I can tottally see me removing my polish on the bus ride home afterwork without a mess or smell of remover, so I don't have to spend time scrubbing them later when I get home. I heard that the polish is supposed to peel off in sheets, but i had to pick at mine a bit. Still overall a lot easier than traditional removal and not damaging at all to the nail.

I will be trying out this method again over a creme polish in the next few days which I only anticipate wearing for three days. I'll let you know how it goes.

Thursday, November 10, 2011

Getting Rid of Bubbles/Sheet Marks Without Ruining Your Mani

I'm sure many of you have noticed bubbling polish at least once. When I first started polishing my nails I noticed it was usually my Sally Hansen top coats that would cause them, so I stopped using them. So I guess my first tip would be:

If you are experience bubbling for the first time try to narrow down what caused it; was it a new brand of polish, base or top coat? Did you wash your hands before applying your polish etc. Once you narrow down what is causing the bubbles, you know now to prevent it in the future.

If you still cannot pin point what exactly it is  that causes bubbling, read on. I applied Revlon's Perplexed last week and loved it to death! These are the photos I took of it right after application of the polish and top coat.


Not too bubbly, right? Well, I did this before bed and when I woke up in the morning all of my finger nails had some degree of bubbling and slight sheet marks! I wish I had photos to show you, it was way worse than the ones above.

The first thing I did before going to work was take out my trusty nail polish thinner and a paint brush I picked up from the dollar store. I dipped the brush in to the thinner and applied it on to the nail like you would nail polish. Let it dry and I was off to work. It helped, but some of the bubbling was so bad you could still see it.

As soon as got home I repeated what I had don that morning and finished it off with a thin coat of top coat. Tada! Good as new without having to redo the whole thing!

So basically follow these tips to get rid of bubbling without having to start all over again. 

1. Once polish is completely dry, apply nail polish thinner to the nail with a brush. 

2. Once the polish thinner is completely dry, if no bubbles are present, apply top coat. If there are still bubbles repeat step 2 once the polish is completely dry from the first layer of thinner. 

3. Once you are happy with the smoothness of the polish apply a top coat and you're done.

Pretty easy right! And it works for sheet marks too. This is how my manicure looked afterwords:

This was also after several days of wear.

Some other things to consider to prevent bubbling in the future are:

- Always wash your hands before applying polish. Natural oils in our skin may prevent the polish from adhering properly to the nail resulting in bubbles or an uneven look.

- Make sure not to apply lotion before applying nail polish.

- Before polishing your nails, swab each nail individually with nail polish remover or pure acetone. You don't need a lot, just a light swipe on each nail.

- If you have only recently started to realize that a polish, including top or base coat is causing bubbles that didn't before, I would suggest thinning out the polish and applying thinner coats.

- If you're using a new polish, always start out with thinner coats and build up, thicker coats usually lead to unevenness and bubbles. I think this is my main issue, I can be so impatient sometimes!

I hope I helped! Let me know if you have any of your own tips :)

Friday, October 28, 2011

A Halloween Tutorial - Pumpkin nails

Happy Friday! The Halloween weekend is almost here, and today I have a quick and easy tutorial with a slight twist from Asami's Pumpkin nails. It's basically the same idea, but I'm providing you with an alternative way of creating the jack-o-lanern face. Insead of using dry polish strips or halloween nail plates, I came up with an interesting way to make your perfect jack-o-lantern design . Below is the final look.


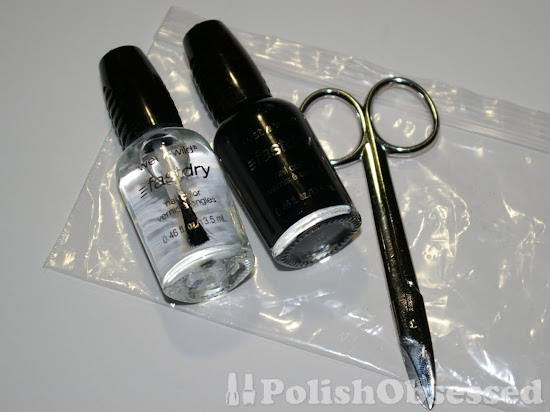
And this is all you need:
- A coloured nail polish you'd like for the design
- A top coat
- A plastic bag
- A pair of sharp scissors (small ones work best)

Tweezers will also be usefull!


First you want to grab your plastic bag and paint it generously with whatever colour you'd like to create your design in. I used Wet N' Wild's Ebony Hates Chris.


Once the polish is completely dry, you want to gently peel it off of the plastic and cut out your jack-o-lantern shapes.


Use your tweezers to place your shapes sticky side down on your nail.


Once you have all the pieces in the right place, you can finish everything off with a top coat!


Super easy right?! The design posibilities are endless and you can even create a whole pattern with polish on the plastic and transfer it to your nails.


One final Halloween inspired mani on Monday :)

Monday, March 7, 2011

Reader Request - Polish Application Tips, Tricks and Tutorial

Hey Ladies,

The other day I got a comment on my post for Revlon's Gum Drop asking about application for harder to apply polishes. Rather than providing a brief explanation, I decided to dedicate a post to application of nail polish.

First of all I just would like to thank the commenter (she was anonymous) for your kind words and request. I can definitely provide you with some tips for applying lighter, thick cream and/or sheer shades. Although the request was for a video tutorial, I have never done one before and would not know how I would go about doing one... plus I am a little camera shy, so for now I have included a step by step photo tutorial.

The key to good application with troublesome polishes is patience. For a colour like gum drop I applied thin coats one by one with a short wait time in between. I also added more coats then I usually do (The norm for me is 2, but this time I did 4) to even out application.

If you choose to do 3 or more coats of polish, I highly recommend using a quick dry top coat to ensure that the polish dries properly and you don't end up with and dents or marks.

If I find a polish is too thick for application, in this case the commenter was referring to For Audry, (more recently for me, Sea Spray from the Anchors Away collection), I apply some nail polish thinner before application.


Nail polish thinner is pretty cheap and can be easily found in beauty supply stores. I personally use the one from Sally's, it's a decent price for the amount that your receive since you only need a few drops per bottle. I usually give the polish a shake after applying the thinner and check the consistency. If it is still not right, I add some more thinner until I get the desired consistency.

Once your have your polish prepared, you are ready for application. Below I have listed the steps I take when applying polish. For this tutorial I used China Glaze, Emerald Fitzgerald on a fake nail to demonstrate.


First, I wipe any access polish from one side of my brush on the side of the bottle.


Next, I place the brush about a centimeter above the cuticle...


...and gently push down towards the cuticle without touching it. This helps to create a curve at the base of the nail.


Note: The size of the gap you leave between the ail and cuticle is up to you. Since I am working with a fake nail I left a larger gap for demonstration purposes only, prefer a small gap.

This is how it looks with the brush removed

I then pull the brush up in a straight line towards the tip of the nail


Repeat the same for the left side of the line of polish you've just created...


and right side of the nail while making sure that the base of the polish follows the same curve of the cuticle.


For prolonged wear, I wrap my tips. This consists of applying some polish directly to the tip of the nail.


When a polish does not offer full coverage in 3 swipes or is not even, I may apply some additional small quick strokes to even the polish up.

After applying to all fingers, leave some time to dry and then repeat the whole process as necessary until you are happy with the opacity.

Usually I find that if the polish is still acting up or doesn't look even, I use a nice coat of Seche Vite to seal and even everything out and help to dry quickly.


I also wrap the tips when applying top coat to my nails.


Now, no one is perfect, and I usually end up with some polish on my skin, mostly on my right hand since am right handed. Some tips I have to clean up include:

- dip a brush in to acetone and clean as needed
- a great tip on brushes I found recently at R3 Daily was to cut your brush on an angle so you have a tip which is more precise with clean up.
- apply lotion to your skin (not nails) before applying the polish. If polish gets on your skin, you can just use an orange wood stick to gently scratch the polish off
- take a shower or wash your hands in warm water with soap when your polish has fully dried. your skin absorbs the water and the polish will come off with an orange wood stick as in the previous tip.

With practice, application will become easier, I really used to suck at it! Also, take your time and move slowly, your application will be more accurate.

I think that is the best advice that I can offer, hope I helped! Let me know if you have any other questions or tutorial requests.