Starting to get back to reality, anyway!
What a month July was, so much going on, such a great and happy time in my life. During this time I celebrated by 29th birthday (one more year till 30, yikes!), got hitched and travelled for Jamaica for 11 days on my honeymoon. I am slowly floating back to reality and trying to catch up on all the loose ends I left before the wedding/honeymoon and getting back in to the rhythm of things.
One of those things on my list is blogging and today I am sharing my wedding mani. I decided to go with gels for extended wear since I applied it a good 3 days before the wedding day. I also decided to keep it pretty traditional. I had other ideas in mind and played around with what I wanted to do, but in the end I decided on a classis French mani with a clear base.
I used three products, Bio Seaweed Gel No Sanding Base, No-Wipe top coat and 3 Step colour in 01 White. As you would assume I applied the base, cured, wiped with alcohol then carefully, with no quited drew on the white tips. I took a litter longer than anticipated with this to make it as natural looking as possible. I initally tried striping tape to try a straight edged tip, but it looked to harsh. I also tryed using French manicure guides with no success, they kept bleeding on me.
I applied two coats on each nail, curing in-between and sealed it off with the no-wipe, top coat, my favorite! I really loved how delicate it made my hands look and although not 100% perfect, the tips look flawless in the photos!
Stay tuned for my next post on my honeymoon manis... yes, there were multiple!
Showing posts with label UV gel. Show all posts
Thursday, August 4, 2016
Friday, April 8, 2016
Madam Glam Review, Two!
I was recently contacted by Madam Glam again to try out some new products. I chose to try some more chameleon gels as well as their peel off base coat, a new product for Madam Glam. Before I get in to the overview of products I received, I wanted to offer you, my readers with an awesome discount should you be interested in purchasing anything from Madam Glam. Get 30% off your entire purchase by using the code Danielle30, or click here to have the code ready to go on the site!
Let's se what I received below!
My Boo is a deep purple creme when cold and changes to a light blue when warm. Very similar to Pop Goes My Heart, but without the glitter. Two coats are shown in my swatch below.
Ladies First is a maroon brown creme when cold and changes to a bright orange leaning red when warm. This was the shade I was most disappointed with, on the site the cold state looked to be a deep burgundy, almost black. Two coats are shown in the swatch below.
Sunshine is a bright juicy orange creme when cold and changes to a bright yellow when warm. This was my favorite! I can't wait to wear this in the summer! Two coats are shown in the swatch below
As the previous chameleon gels I reviewed, these typically dry to a matte/satin finish without a topcoat. I added a clear cot gel on top to add some gloss.
Overall these polishes applied well with no trouble. With the exception of Ladies First, the other colors were well represented on Madam Glam's site for each temperature. I will have a followup on the wear of these particular shades in the future.
Stay tuned for my next post where I go in to more detail on the Peel off Base Coat.
*These products were sent to me for an honest review, all views expressed are my own honest option.
Let's se what I received below!
My Boo is a deep purple creme when cold and changes to a light blue when warm. Very similar to Pop Goes My Heart, but without the glitter. Two coats are shown in my swatch below.
Ladies First is a maroon brown creme when cold and changes to a bright orange leaning red when warm. This was the shade I was most disappointed with, on the site the cold state looked to be a deep burgundy, almost black. Two coats are shown in the swatch below.
Sunshine is a bright juicy orange creme when cold and changes to a bright yellow when warm. This was my favorite! I can't wait to wear this in the summer! Two coats are shown in the swatch below
| Cold state |
| Warm state |
Overall these polishes applied well with no trouble. With the exception of Ladies First, the other colors were well represented on Madam Glam's site for each temperature. I will have a followup on the wear of these particular shades in the future.
Stay tuned for my next post where I go in to more detail on the Peel off Base Coat.
*These products were sent to me for an honest review, all views expressed are my own honest option.
Labels:
Madam Glam,
peel off base,
review,
thermal,
UV gel
Tuesday, December 15, 2015
Pop Goes My Heart! Madam Glam Review - Part Two
Today I have part two of my Madam Glam Chameleon Gel polish review. First to wear and test out is Pop Goes My Heart! I just CANNOT get enough of this polish! So much Fun to wear!
As I stated in part 1, I just received the four gels to try, no base or top coats. For this review I wanted to note that I used my own personal base and top coats, both Bio Seaweed Gel. I started off with a layer of basecoat which was cured for one minute and proceeded to add a coat of Pop Goes My Heart. On the nail wheel when I did my initial swatches I found the formula thick. On the nail I found it to actually apply a little better, although still thick. It was easier to manipulate which I think is due to the slightly sticky residue left from the basecoat. I tried to make my layers as thin as I possibly could.
After the first coat was cured I added a second which build up the opacity well. the fun thing about curing is the colour changes almost instantaneously due to the warmth of the light. Once the second layer was done curing I added a final layer of top coat which cured without any wiping.
A cool thing about these chameleon gels is that they dry to a matte finish should you decide not to add a top coat, you just need to be sure to wipe each nail with (99%) alcohol to remove the tacky layer after curing.
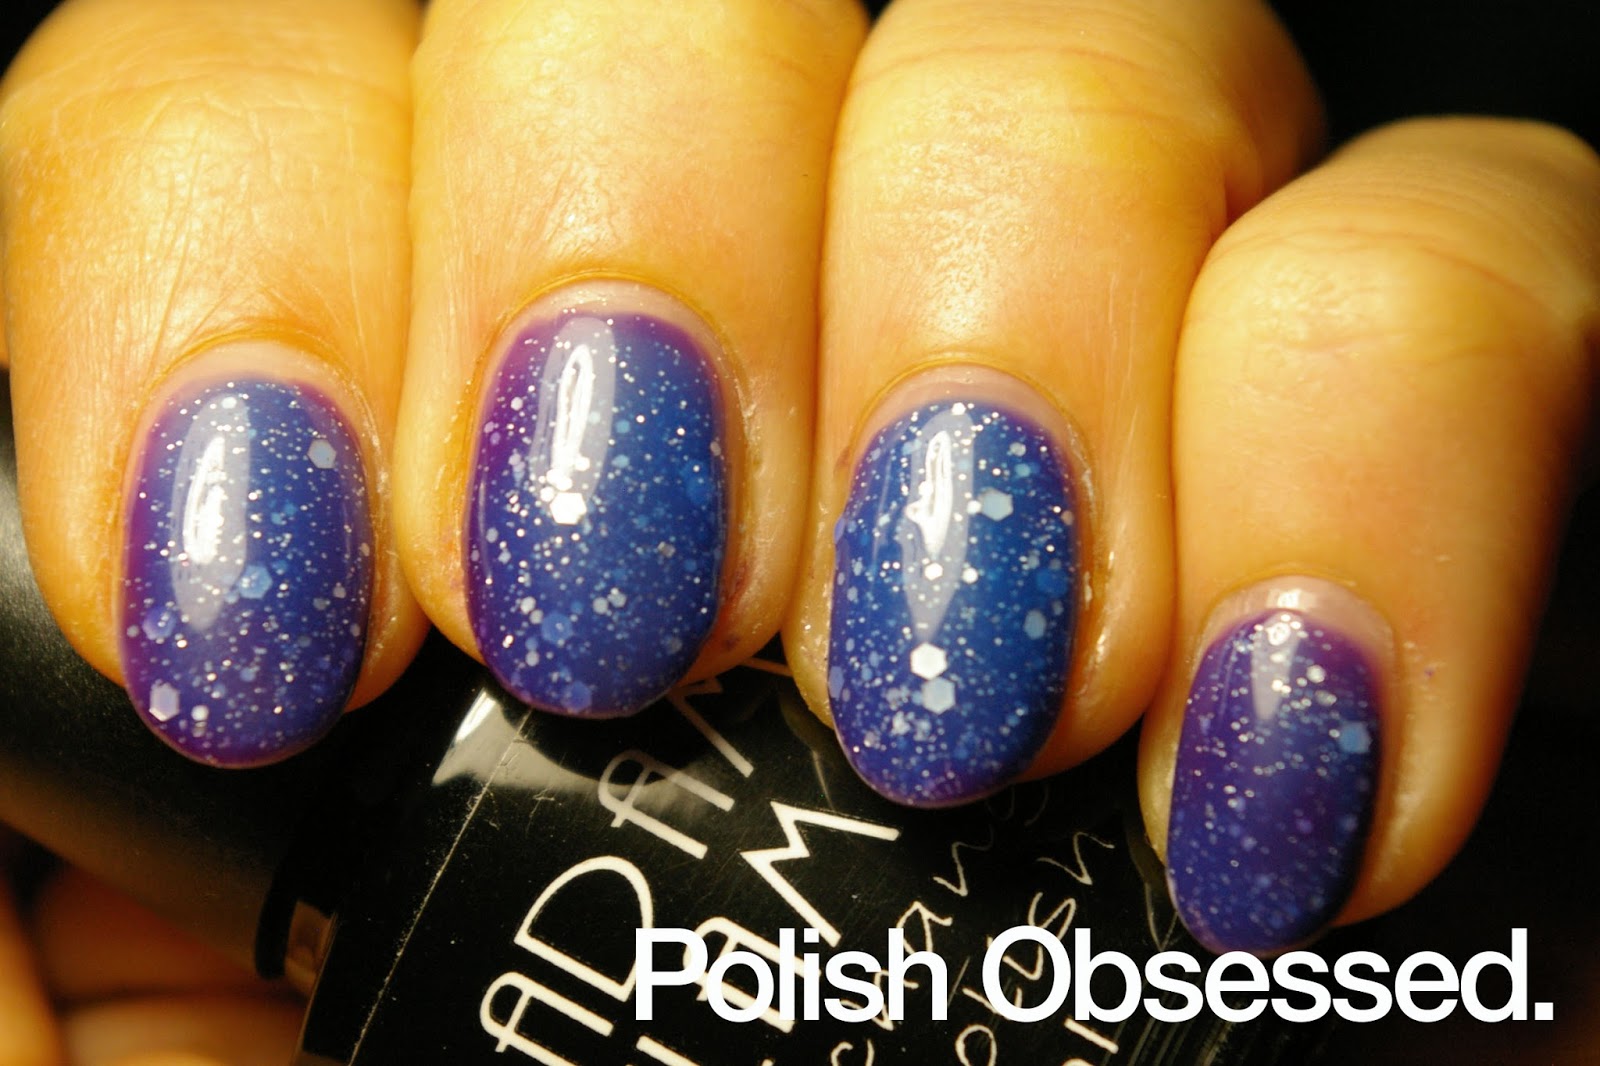
I am loving this gel, I am having too much fun with it! When it is cold it is a deep purple and at it's warmest it is a light blue. Depending on my body temperature (or the temperature or things I am touching or interacting with) the shade can be anywhere from a mix of the two shades or an in between colour (if changed to a deep blue from purple before changing to the light blue). It reminds me of space with the white pieces of glitter.
Wear: I wore this polish for two full weeks and it wore fantastically! Still as shiny and glossy as the first day I applied it with no visible wear or chips, not even in the usual spots! The growth is the only giveaway of the amount of time the gel has been on my nails. Check out the photo below and compare the amount of space between my cuticle and the gel.
It is just too cool and my photos unfortunately do not to it justice. Most show with both warm and cold patches, with the exception of the last photo above which is 100% cold! I can't wait to try out the rest of the ones I received!
*This product was sent to me for an honest review, all views expressed are my own honest option.
As I stated in part 1, I just received the four gels to try, no base or top coats. For this review I wanted to note that I used my own personal base and top coats, both Bio Seaweed Gel. I started off with a layer of basecoat which was cured for one minute and proceeded to add a coat of Pop Goes My Heart. On the nail wheel when I did my initial swatches I found the formula thick. On the nail I found it to actually apply a little better, although still thick. It was easier to manipulate which I think is due to the slightly sticky residue left from the basecoat. I tried to make my layers as thin as I possibly could.
After the first coat was cured I added a second which build up the opacity well. the fun thing about curing is the colour changes almost instantaneously due to the warmth of the light. Once the second layer was done curing I added a final layer of top coat which cured without any wiping.
A cool thing about these chameleon gels is that they dry to a matte finish should you decide not to add a top coat, you just need to be sure to wipe each nail with (99%) alcohol to remove the tacky layer after curing.
I am loving this gel, I am having too much fun with it! When it is cold it is a deep purple and at it's warmest it is a light blue. Depending on my body temperature (or the temperature or things I am touching or interacting with) the shade can be anywhere from a mix of the two shades or an in between colour (if changed to a deep blue from purple before changing to the light blue). It reminds me of space with the white pieces of glitter.
| Day one - All above photos taken right after application |
| After two full weeks of wear! |
*This product was sent to me for an honest review, all views expressed are my own honest option.
Monday, December 7, 2015
Madam Glam Chameleon Gels - Swatches and Review
Hello friends! I cannot believe how this month has been speeding by!
Today I have a new to me brand I will be reviewing, Madam Glam. They were kind enough to send me some of their polishes to try out, the coolest part is that they are thermals. Gel and thermals?! Whaaat! To say I was eager to try these out was an understatement!
I received four Madam Glam Chameleon Gel polishes to review:
Chocolate With Nuts
Sweet Illusion
Pop Goes My heart
What Colour is the Dress?
Chocolate With Nuts:
Cold: a rich chocolaty brown creme base with white pearl hex and regular glitter
Warm: a peach leaning white creme base with white pearl hex and regular glitter
Application: a little on the thick side, probably due to the glitter, however manageable
Sweet Illusion:
Cold: a darker greyed out blue with a hint of sparse silver glitter
Warm: a lighter greyed out blue with a hint of sparse silver glitter
Application: good, applied well
Pop Goes My Heart:
Cold: purple creme base with white pearl hex and regular glitter
Warm: blue creme base with white pearl hex and regular glitter
Application: a little on the thick side, probably due to the glitter, however manageable
What Color is the Dress?
Cold: Rich burgundy creme with a sprinkling of silver glitter
Warm: night sky blue with a sprinkling of silver glitter
Application: good, applied well
Swatches below, from left to right, COLD Chocolate with Nuts, Sweet Illusion, Pop Goes My Heart and What Color is the Dress?
Swatches below, from left to right, WARM Chocolate with Nuts, Sweet Illusion, Pop Goes My Heart and What Color is the Dress?
Overall Opinion:
They applied and cured similar to other gels I have tried, however I found them to smell different. I should also mention that these are 5-free and cruelty free so that is a plus.
I noticed on their regular gels they have a colour swatch on the top handle and these did not, however the names are clearly marked (on a sparkly sticker!) at the bottom of each bottle. The Chameleon bottles are slightly smaller than the regular gels (only by 5 ml), not a big deal but worth mentioning.
The bottles I received did not contain any instructions, which was fine by me because I've done this before, and even if I didn't there is the internet! The one thing that confused me was that after curing my swatches in the light they were still a little sticky, which is usually to be expected. Usually when swatching I don't normally apply a top coat, so I wiped each swatch with alcohol to clean the sticky bit off. However, I noticed some pigment on the cotton pad after wiping and noticed that each swatch dried to a matte finish. At fist I was confused, I thought I did something wrong! But now I actually think it's kind of cool, I've never seen a matte gel polish before. The awesome thing is you can add a gel top coat to finish it off and it's glossy again!
Case ans point a sneak peek at part two of this post below, Pop Goes My Heat! I used my own personal no wipe gel topcoat.
The last thing I need to mention is the colour changing abilities. They reacted really well to hot and cold with clear differences in colour. I am truly impressed with these gels and in part two of this review I will be sharing with you how they wear. Let's just say these guys are a major distraction, I am always looking at my nails!
*This product was sent to me for an honest review, all views expressed are my own honest option.
Today I have a new to me brand I will be reviewing, Madam Glam. They were kind enough to send me some of their polishes to try out, the coolest part is that they are thermals. Gel and thermals?! Whaaat! To say I was eager to try these out was an understatement!
I received four Madam Glam Chameleon Gel polishes to review:
Chocolate With Nuts
Sweet Illusion
Pop Goes My heart
What Colour is the Dress?
Chocolate With Nuts:
Cold: a rich chocolaty brown creme base with white pearl hex and regular glitter
Warm: a peach leaning white creme base with white pearl hex and regular glitter
Application: a little on the thick side, probably due to the glitter, however manageable
Sweet Illusion:
Cold: a darker greyed out blue with a hint of sparse silver glitter
Warm: a lighter greyed out blue with a hint of sparse silver glitter
Application: good, applied well
Pop Goes My Heart:
Cold: purple creme base with white pearl hex and regular glitter
Warm: blue creme base with white pearl hex and regular glitter
Application: a little on the thick side, probably due to the glitter, however manageable
What Color is the Dress?
Cold: Rich burgundy creme with a sprinkling of silver glitter
Warm: night sky blue with a sprinkling of silver glitter
Application: good, applied well
Swatches below, from left to right, COLD Chocolate with Nuts, Sweet Illusion, Pop Goes My Heart and What Color is the Dress?
Overall Opinion:
They applied and cured similar to other gels I have tried, however I found them to smell different. I should also mention that these are 5-free and cruelty free so that is a plus.
I noticed on their regular gels they have a colour swatch on the top handle and these did not, however the names are clearly marked (on a sparkly sticker!) at the bottom of each bottle. The Chameleon bottles are slightly smaller than the regular gels (only by 5 ml), not a big deal but worth mentioning.
The bottles I received did not contain any instructions, which was fine by me because I've done this before, and even if I didn't there is the internet! The one thing that confused me was that after curing my swatches in the light they were still a little sticky, which is usually to be expected. Usually when swatching I don't normally apply a top coat, so I wiped each swatch with alcohol to clean the sticky bit off. However, I noticed some pigment on the cotton pad after wiping and noticed that each swatch dried to a matte finish. At fist I was confused, I thought I did something wrong! But now I actually think it's kind of cool, I've never seen a matte gel polish before. The awesome thing is you can add a gel top coat to finish it off and it's glossy again!
Case ans point a sneak peek at part two of this post below, Pop Goes My Heat! I used my own personal no wipe gel topcoat.
The last thing I need to mention is the colour changing abilities. They reacted really well to hot and cold with clear differences in colour. I am truly impressed with these gels and in part two of this review I will be sharing with you how they wear. Let's just say these guys are a major distraction, I am always looking at my nails!
*This product was sent to me for an honest review, all views expressed are my own honest option.
Friday, August 14, 2015
Victoria - Bio Seaweed Gel Review Part 2
Happy Friday! Today I have part three in my Bio Seaweed gel polish series. I decided to try out Unity All-In-One Soak-Off Gel Polish 261, Victoria on my toes.
The formula is on the thick side, but nothing too unmanageable. My need to thin my polishes out was strong with this one, however! I applied three thin coats to the nail curing for a minute with my UV LED lamp.
The final post in this series will be a recap and follow up of the products I used from Bio Seaweed Gel, The No-Wipe Top Coat I used for my broken nail and Victoria for my pedicure. This will include how long they lasted, and what they looked like before I removed them.
*This product was sent to me for an honest review, all views expressed are my own honest option.
Victoria is such a great summer shade, it's a light, yet bright, pastel creme that boarders the line of neon. I usually prefer more feminine shades or bold cremes on my toes, but really am liking this colour.
The formula is on the thick side, but nothing too unmanageable. My need to thin my polishes out was strong with this one, however! I applied three thin coats to the nail curing for a minute with my UV LED lamp.
What I love about this formulation is that you do not require a base or topcoat and there is no sticky layer to remove after curing. I have been wearing this shade for two weeks now and it looks the same as it did hen I applied it! To let you know how hard I work my feet, I do a lot of walking in one day for my commute in to work plus I get my workout in six days a week... I can be pretty hard on my feet. But this gel polish has stood up great so far!
The final post in this series will be a recap and follow up of the products I used from Bio Seaweed Gel, The No-Wipe Top Coat I used for my broken nail and Victoria for my pedicure. This will include how long they lasted, and what they looked like before I removed them.
*This product was sent to me for an honest review, all views expressed are my own honest option.
Friday, August 7, 2015
Healing A Broken Nail - Tutorial
Today I have part three of a four part series reviewing the products I was sent for review from Bio Seaweed Gel. Since the gel polishes they supplied me with do not require a top coat on the toes, I decided to try their No-Wipe Top Coat for another purpose, a broken nail.
It was a split second mistake that almost ripped off the free edge of my middle nail! I patiently waited all day to mend the hanging nail. It happened on the way in to the office. As soon as I got home I went to work on the nail!
What I used:
Once that dried, I added another few drops of glue to the nail and applied the tea bag strip. I made sure to fully cover beyond the break, but not the full nail. Make sure the strip fully adheres to the nail and absorbs the glue.
Once that had dried, I filled away and buffed out the excess strip (shown above) and made the nail as smooth as I could. This is when I applied my UV gel top coat and cured. I used two coats for added protection (shown below).
The thing I like best about this gel top coat is that it does not produce a sticky layer which needs to be removed for the polish to shine. Less work and time spent on gels is always awesome!
This has been wearing great for me and really fused the broken nail back together. In the past I have just glued a fake nail on the broken one and waited for the nail to grow back in, but this looks and feels way more natural and I get to keep my nail and length without chopping down the rest!
Do you have any tips for nail breaks? What do you usually do?
*This product was sent to me for an honest review, all views expressed are my own honest option.
It was a split second mistake that almost ripped off the free edge of my middle nail! I patiently waited all day to mend the hanging nail. It happened on the way in to the office. As soon as I got home I went to work on the nail!
What I used:
- polish remover
- super glue (or nail glue)
- strip cut from tea bag
- Bio Seaweed Gel No-Wipe Top Coat.
Once that dried, I added another few drops of glue to the nail and applied the tea bag strip. I made sure to fully cover beyond the break, but not the full nail. Make sure the strip fully adheres to the nail and absorbs the glue.
Once that had dried, I filled away and buffed out the excess strip (shown above) and made the nail as smooth as I could. This is when I applied my UV gel top coat and cured. I used two coats for added protection (shown below).
The thing I like best about this gel top coat is that it does not produce a sticky layer which needs to be removed for the polish to shine. Less work and time spent on gels is always awesome!
This has been wearing great for me and really fused the broken nail back together. In the past I have just glued a fake nail on the broken one and waited for the nail to grow back in, but this looks and feels way more natural and I get to keep my nail and length without chopping down the rest!
Do you have any tips for nail breaks? What do you usually do?
*This product was sent to me for an honest review, all views expressed are my own honest option.
Wednesday, August 5, 2015
Bio Seaweed Gel, Uptown Lights - Collection and Review Part 1
Bio Seaweed Gel sent me some polishes from their latest Uptown Lights collection for review. I was lucky enough to pick two shades from the collection of fifteen polishes.
Below are the colours, from left to right, top to bottom;
Row one: Charlottetown, Edmonton, Fredericton, Halifax, Iqaluit
Row two: Montreal, Ottawa, Quebec City, Regina, St. John's
Row three: Toronto, Victoria, Whitehorse, Winnipeg and Yellowknife.
I love how they incorporate their Canadian roots in to the brand. If you couldn't already tell, all polishes are named after various cities in Canada! The two polishes I chose were Victoria and St. John's. I kind of regret not getting Toronto (the light blue seen on the model's hand above), but I had a feeling that I had something similar.
This is an interesting collection for summer, some brights, neutrals and dusty taupes. I received the following, one No-Wipe Top Coat, Unity All-In-One Soak-Off Gel Polish, 261 Victoria and Unity All-In-One Soak-Off Gel Polish, 259 St. John's.
Victoria is a pastel, on the verge of being neon, lime green. This is my favorite out of the two!
St. John's is a deep and dusty cornflower blue.
What I noticed about these gels,when compared to the other Bio Seaweed Gels in my collection, is that they do not produce a sticky layer after curing, this was a welcome surprise! They both dry super glossy after one minute of LED UV curing.
*This product was sent to me for an honest review, all views expressed are my own honest option.
Below are the colours, from left to right, top to bottom;
Row one: Charlottetown, Edmonton, Fredericton, Halifax, Iqaluit
Row two: Montreal, Ottawa, Quebec City, Regina, St. John's
Row three: Toronto, Victoria, Whitehorse, Winnipeg and Yellowknife.
I love how they incorporate their Canadian roots in to the brand. If you couldn't already tell, all polishes are named after various cities in Canada! The two polishes I chose were Victoria and St. John's. I kind of regret not getting Toronto (the light blue seen on the model's hand above), but I had a feeling that I had something similar.
This is an interesting collection for summer, some brights, neutrals and dusty taupes. I received the following, one No-Wipe Top Coat, Unity All-In-One Soak-Off Gel Polish, 261 Victoria and Unity All-In-One Soak-Off Gel Polish, 259 St. John's.
Victoria is a pastel, on the verge of being neon, lime green. This is my favorite out of the two!
St. John's is a deep and dusty cornflower blue.
What I noticed about these gels,when compared to the other Bio Seaweed Gels in my collection, is that they do not produce a sticky layer after curing, this was a welcome surprise! They both dry super glossy after one minute of LED UV curing.
I found the formula on each polish to be thick, however, St. John's was thicker than Victoria. Stay tuned for more information on application, usage and wear of the products I received in upcoming posts!
*This product was sent to me for an honest review, all views expressed are my own honest option.
Labels:
bio seaweed gel,
creme,
green,
periwinkle,
UV gel
Wednesday, March 25, 2015
...This is the Most Craziest Shit Ever!
I can't help but hum a Gwen Stefani tune while applying this polish! Although this polish has nothing to do with the song Don't Get It Twisted, OPI's Push and Shove is so crazy cool!
I had originally tried this polish shortly after it's release last year. It is now infamous for wonky application and short wear time and requires you to follow some steps usually not taken with regular polishes such as using a special base and no topcoat. Since my nails already had a base of Bio Seaweed Gel that I applied to avoid staining from this polish, I wanted to test how well the Push and Shove would apply over the gel alone when compared to the mini Lay Down That Base, base coat the polish comes with. That bottle is hilarious by the way! That is another reason I decided to try out a gel as my base, what happens when that tiny base polish runs out?
Compared side by side the Push and Shove over the gel base appears the same if not better then the Lay Down That Base, base. I used Lay Down that Base on my pinky nail and no base, other than the gel previously applied, to my other nails. Not only did it apply well, but the gel smoothed out my nail bed giving a beautifully even, streak-free mirror finish that is so awesome! My photos hardly do this polish justice!
You guys, my nails are literally tiny little mirrors, so shiny! Two coats were applied since I did not plan on applying a topcoat. I find you can easily get away with one thicker coat, but noticed during application that two thinner coats product better results. The gel base helps to smooth out any imperfections in my nail making the chrome appear strong and flawless... well as flawless as I think I can get! The best part is application was five about minutes, probably including dry time as well.
Unfortunately wear time is about the same as over Lay Down That Base. I for it for a few days, then when I couldn't stand the tip wear and slight chipping I just changed my mani up.
I had originally tried this polish shortly after it's release last year. It is now infamous for wonky application and short wear time and requires you to follow some steps usually not taken with regular polishes such as using a special base and no topcoat. Since my nails already had a base of Bio Seaweed Gel that I applied to avoid staining from this polish, I wanted to test how well the Push and Shove would apply over the gel alone when compared to the mini Lay Down That Base, base coat the polish comes with. That bottle is hilarious by the way! That is another reason I decided to try out a gel as my base, what happens when that tiny base polish runs out?
Compared side by side the Push and Shove over the gel base appears the same if not better then the Lay Down That Base, base. I used Lay Down that Base on my pinky nail and no base, other than the gel previously applied, to my other nails. Not only did it apply well, but the gel smoothed out my nail bed giving a beautifully even, streak-free mirror finish that is so awesome! My photos hardly do this polish justice!
You guys, my nails are literally tiny little mirrors, so shiny! Two coats were applied since I did not plan on applying a topcoat. I find you can easily get away with one thicker coat, but noticed during application that two thinner coats product better results. The gel base helps to smooth out any imperfections in my nail making the chrome appear strong and flawless... well as flawless as I think I can get! The best part is application was five about minutes, probably including dry time as well.
Unfortunately wear time is about the same as over Lay Down That Base. I for it for a few days, then when I couldn't stand the tip wear and slight chipping I just changed my mani up.
Labels:
bio seaweed gel,
chrome,
mirror shine,
OPI,
silver,
UV gel
Friday, January 31, 2014
SensatiNail Review - UV Gel Polish
I have been sporting an awesome pedi for just over a month now, I gave it to myself just before Christmas. Isn't that crazy, it's been just over a month since the holiday season! I tried out some LED UV gel polishes I acquired towards the end of 2013 from SensatiNail. I typically go for neutral shades when picking out gel polishes, if I'm going to be wearing them longer than regular polish I'd like to use them as a base for nail art, glitter toppers, etc., should I want to change it up without removing the full gel.
My first SensatiNail experience is with two colours, Midnight Rendezvous and Gold Glitter. Midnight Rendezvous is a basic black creme and Gold Glitter is a dense gold glitter in a clear base, clever name, I know ;) . I thought these would look great together should my toes be showing during Christmas and New Years, something with a little glitter, but nothing over the top. In conjunction with the Sensatinail colour polishes, I used my Bioseaweed Gel base and top coat because it is what I have on hand. For me there was no need to purchase the starter pack since I already own UV gel tools (nail cleanser, base/top coat and Kiss branded LED light).
I won't get in to too much detail about the steps involved, but this is the order of application for me:
- clean nails (99% alcohol)
- apply base coat and cure
- apply thin coat Midnight Rendezvous and cure
- apply thin coat Gold Glitter and cure
- apply top coat and cure
- apply 99% alcohol to remove residue and reveal shine
Very quick and simple steps to follow for a flawless, shiny looking mani or pedi that dries in seconds. I am super happy with the results, as I said I applied this a day or two before Christmas and it has held up very well. I didn't take any photos after the initial application, the photos in this post are current, if there was no growth it would look as if I just applied it! As you can see the glitter is pretty dense, I probably could have reached full opacity with a few coats.
I originally decided to try these polishes as a recommendation from a friend and am glad I did. These are highly pigmented and the formula is thin and easy to apply. I also like how it works with my Kiss branded UV LED lamp. The only dissapointment I have is bottle size, I know most gel polishes available to non-professionals are smaller, but It would be nice to have the option. However, due to formula and pigmentation, I do see these bottles lasting me a while.
I have also noticed another offshoot brand/collection from Sensatinail (Nailene), Fuse. I saw these at Rite Aid while in the States this month and saw a review on YouTube. Although the polish size is larger and the price point is lower, from what I gather it is not as long lasting as the Sensatinal gels.
My first SensatiNail experience is with two colours, Midnight Rendezvous and Gold Glitter. Midnight Rendezvous is a basic black creme and Gold Glitter is a dense gold glitter in a clear base, clever name, I know ;) . I thought these would look great together should my toes be showing during Christmas and New Years, something with a little glitter, but nothing over the top. In conjunction with the Sensatinail colour polishes, I used my Bioseaweed Gel base and top coat because it is what I have on hand. For me there was no need to purchase the starter pack since I already own UV gel tools (nail cleanser, base/top coat and Kiss branded LED light).
I won't get in to too much detail about the steps involved, but this is the order of application for me:
- clean nails (99% alcohol)
- apply base coat and cure
- apply thin coat Midnight Rendezvous and cure
- apply thin coat Gold Glitter and cure
- apply top coat and cure
- apply 99% alcohol to remove residue and reveal shine
Very quick and simple steps to follow for a flawless, shiny looking mani or pedi that dries in seconds. I am super happy with the results, as I said I applied this a day or two before Christmas and it has held up very well. I didn't take any photos after the initial application, the photos in this post are current, if there was no growth it would look as if I just applied it! As you can see the glitter is pretty dense, I probably could have reached full opacity with a few coats.
I originally decided to try these polishes as a recommendation from a friend and am glad I did. These are highly pigmented and the formula is thin and easy to apply. I also like how it works with my Kiss branded UV LED lamp. The only dissapointment I have is bottle size, I know most gel polishes available to non-professionals are smaller, but It would be nice to have the option. However, due to formula and pigmentation, I do see these bottles lasting me a while.
I have also noticed another offshoot brand/collection from Sensatinail (Nailene), Fuse. I saw these at Rite Aid while in the States this month and saw a review on YouTube. Although the polish size is larger and the price point is lower, from what I gather it is not as long lasting as the Sensatinal gels.
Wednesday, August 21, 2013
Bio Seaweed Gel Review - Followup
I am home from my vacation, although I wish it could have lasted a little longer...
The same can be said for one half of my review of Bio Seaweed Gel polish. I'm talking about my little sandwiching experiment, didn't go exactly as I had planned. Here is my mani before my vacation:
I was hoping since I sandwiched a regular polish I between a gel base and top coat I would be chip free for the same amount of time as a gel polish alone. Unfortunately this was not the case, I think what made this worse was the fact that I used a neon, China Glaze Son of a Peach, which are notorious for chipping and short wear time.
At first I tried to ignore the lifting of the polish and tiny chips, but I am a picker! I couldn't help myself, but I picked the whole mani off by the end of my trip! I definitely do not recommend this, it is not so easy on the nail bed.
I definitely want to try this method again with these tips in mind:
- After the base had been cured apply a gel too and cure before adding the regular polish and another UV top.
- Do not wrap the tips with the regular polish! I think this was my main issue! The regular polish started to peel from the wrap which cases the gel to lift up as well.
- Do wrap the tips with the UV base and top coat.
- Take your time! Let the regular polish dry as long as possible before applying and curing the final top coat.
Also consider I was in a hot, tropical destination with wet and busy hands most of my trip, I am sure this was also a factor in quick wear of the polish.
On to regular usage of the UV Bio Seaweed Gel polish with UV base and top coat on my toe nails if you recall, this is what my toes looked like before I left for my vacation:
This wore fantastically! I did some nail art on the big toe and sealed it with a regular top coat and you could see clearly the difference in shine between the big toe and others.
The gel stayed super shiny and lasted my whole trip and then some :) very happy with the wear considering I did a lot of barefoot walking on the beach with gritty sand :)
This wore fantastically! I did some nail art on the big toe and sealed it with a regular top coat and you could see clearly the difference in shine between the big toe and others.
The gel stayed super shiny and lasted my whole trip and then some :) very happy with the wear considering I did a lot of barefoot walking on the beach with gritty sand :)
Labels:
bio seaweed gel,
china glaze neon,
coral,
creme,
orange,
pink,
review,
UV gel
Thursday, August 15, 2013
A Gel Sandwich Test and Review
I received a package from Bio Seaweed Gel Last week with some samples to share with you! Here is a little background on the product from their site:
Bio Seaweed Gel is a professional gel system. Gel polish is applied to either natural nails, artificial nails or even acrylic nails just like regular nail polish but with many more advantages. Gel cures (dries) instantly under UV/LED light so there is no more waiting time as per regular nail polish. Gel is designed to be durable and more suitable for the busy everyday life, created to last 2+ weeks with no chips, lifts or cracks. That is essentially the difference between gel polish and regular nail polish.
Now, you ask yourself how is Bio Seaweed Gel is different than all other competitor gel polish brands? Our brand offers a distinct value and difference because: No dehydrators to thin or stain the natural nails – regardless of wear time. Created to promote natural nail growth. FORMALDEHYDE, TOLUNE, DPB, SOLVENTS & BHA FREE Safe and gentle both during application and removal: no sanding, buffing, primers or bonders needed for application. The industry’s quickest soak-off removal in under 10 minutes.
Versatility: A separate Diamond Shine Top and No-Sanding Base Gel Polish, as well as a Strengthener Builder Gel to complete tip and sculpture extensions.
User-friendly: simple steps and self-leveling make Bio Seaweed Gel quick to learn and a pleasure to work with, our products never shrink or wrinkle – ideal for nail art (140+ colours!)
Innovation: UNITY All-In-One Gel Polish is the original professional top, base, colour & strengthener all-on-one bottle, with no cleansers needed! (the colours dry to the touch with no sticky inhibition layer unlike any other).
They supplied me with two coloured UV gel polishes, one UV diamond shine top coat gel, a coarse nail file and some fun nail art stickers! I will be testing the wear of the UV gel polish on my toes with the UV gel base (purchased by myself) and UV diamond top coat. On my fingers I wanted to try something a little different. I've always wondered what the wear would be like of a regular polish sandwhiched between a UV base and top coat. What better time to try this then on my vacation right!? I will be testing the wear for a full week and report back with the results when I am back.
On my toes:
Base Coat - 1 coat, cured for 2 minutes
Summer Peach - 2 coat, cured for 2 minutes
Diamond Top Coat - 1 coat, cured for 2 minutes
On my fingers:
Base Coat - 1 coat, cured for 2 minutes
Son of a Peach - 3 coats with LOTS of dry time
Diamond Top Coat - 1 coat, cured for 2 minutes
Sweet Peach is a tad off, it is not as pink/red. more of a bright coral.
I had some issues with the application of Son of a Peach that may have been due to the reaction with the base coat. I applied three coats to even it out the best I could. If doing this again I would apply a topcoat right after the base, cure and then apply the regular polish and finish off with another UV top coat to seal it all in. The key here is to ensure the polish is 100% dry before applying the top coat and curing.
Bio Seaweed UV Gels are easy to apply, the formula is thick but easy to manage and the colour options are awesome!
I will report back after my vacation to let you know how the mani and pedi stood up to a week on the beach!
Tuesday, July 23, 2013
Bio Seaweed UV Gel
Today I have a brand of UV gel polish to share with you plus a quick review. I'm not sure how popular this brand, Bio Seaweed Gel is, but I know they do have stand alone salon/spas and I have seen the polishes themselves for sale at my local beauty supply.
Here are some reasons why I have always wanted to try DIY gel nails:
- they keep your natural nails stronger
- long wear of polish
- prevents staining
- helps short nails grow out
I had already done a gel mani on my toes and it wore pretty well. The true test is on the finger nails since they are put through more daily than toes. I applied one coat of base, cured for one minute with my Kiss LED UV lamp, then applied my top coat and cured for another minute. The result was strong wet shine nails!
After everything was cured I preceeded to apply my regular polish on top (Layla, Mercury Twilight). These photos are actually after a week of wear. I basically used the gel as a base for my regular manicures, that way I don't have to use a base coat. This was after removal of the first manicure, Mercury Twilight, with non acetone polish remover. Looks like I just applied them, right? There is a tiny bit of growth visable at the cuticle.
So on to the second week, I applied another polish on top and half way through the week I started picking at it, I thought I was picking at the regular polish on top, but I was picking at the gel too, not so good. I though I could cover it up with a third mani...
I was wrong lol, oh well!.
Removal wasn't too bad, what worked best for me was the foil method with pure acetone. Once I removed the foil the polish didn't just wipe away (maybe I needed to leave it longer? It kind of crumbled and I used an orange wood stick and nail file to pick and file the rest away. Is this normal? Maybe it is just this brand but I have never heard if this before.
I am looking forward to trying this out again very soon, I am taking a trip to Punta Cana next month and want my polish to last since I will not be bringing any with me. Another review on wear to come when I get back.
Subscribe to:
Posts (Atom)