Showing posts with label nude. Show all posts

Friday, June 3, 2016

I Theadora You

The countdown is on guys, just over a month until my wedding and I feel like a lot is going on... but not really. There is still a lot to do, but not in comparison to the big picture of planning a wedding and all that! I feel like I'm at the end at this point. My hardest decision lately is where to go for our honeymoon! Suggestions would be greatly appreciated by the way! I'm looking mostly south, all inclusive.


So why am I bringing this up? Today's mani is what I wore for my bridal shower; A lovely soft shade that is oh so girly. This is OPI's I Theadora You.

I applied more coats of this crelly than I usually apply since I wanted it to be mostly opaque, three coats got me there. The one thing I did not expect is the overall look was more milky than pink tint. You can see what I mean in the flash photos below (last photo below).


I ended up layering Zoya's Godiva Pixie Dust overtop and I really loved the combo. Unfortunately for you guys I forgot to snap a photo. Luckily, I Theadora You is lovey on it's own as well.

Wednesday, February 10, 2016

Colourful Collage

Today I have a mani from early January. It had just started to snow and I wanted a glittery mani. It didn't turn out exactly how I wanted it to, but I will try this technique again another time. I applied Finger Paints Colorful Collage to a cosmetic sponge and blotted in to each nail that was already coated in a think base of OPI I Theadora You.


I was initially going for full coverage with this but it didn't work out. I think I applied one to two coats of the Colorful Collage before adding a another coat of Sally Hansen Salon Open Mica Night, a sparse square holo glitter topper.


I topped the whole thing off with Seche Vite and called it a day. I want to try this look again with a holo or chrome base to fill in the glitter more. Otherwise, this was a super fun and sparkly glitter mani!

Thursday, December 24, 2015

Son of a Nutcracker!

Merry Christmas Eve! This is easily my favorite new glitter topper for Christmas, Funky Fingers, Son of a Nutcracker! Not only is the name awesome, but the glitter, like the other Funky Fingers I own, is awesome!


Son of a Nutcracker is a glitter topper made up of various sized hex glitter in matte red, pink, green white and silver. I decided I wanted a clean look with this glitter so I layered it over one coat of OPI I Theadora You. Such a great sheer crelly with the perfect hint of pink to tint the nails. IT leveled out great.


I thin applied one coat of Son of a Nutcracker over I Theadora You. The formula on Son of a Nutcracker was good. I had the bottle standing on it's top to maximize the amount of glitter on the brush. I applied swiping the nail as usual and also some blotting and manipulated some glitter to space it out to my liking.


I applied a top coat of Seche Vite to seal in the glitter and add high shine and I was done!

Wednesday, July 22, 2015

My Vampire is Hot—Pink!

I decided I wanted to a non-traditional French tip. Something not so classic and more modern. What I decided on was a light, fully opaque base and a slip neon tip.


For my base I used OPI My Vampire is Buff, which as I mentioned in my last post  is an awesome neutral shade. It has more yellow undertones than pink, which work really great with my skintone. Two easy coats were applied to my nails.


Shortly after the base had some time to dry, I applied my hot pink tips. For this I used Color Club Raspberry Rush. Raspberry Rush is apart of the Wicked Sweet collection released in the summer of 2011. All of the polishes in the collection have a fruity scent. I would have assumed the scent of this polish I be raspberries, however to be it smelled exactly like my favorite flavour of bubblegum as a child, Bubblicious, Paradise Punch. Childhood memory below!!


The scent wasn't too overbearing, I really had to sniff my nails after they dried, and almost or got it was scented! I sure if it was applied to the while nail the scent would be stronger.

Using the brush from the polish, I carefully applied the neon shade to the very tips of my nails. With a steady hand and and quick swipe, I matched the other slim crescents on the rest of my nails. I wouldn't say it was 100% perfect, however I am really happy with the end result. I also do think my photos show off every imperfection but in person it looks a bit more flawless.

The one think I learned about using a neon on the tips of my nails is that they wear fairly quickly. Other than the slight tip wear to most the nails. This wore very well. I am also considering applying the same thing to my toes!

Monday, July 20, 2015

My Vampire is Buff

Today I have a perfect palate cleanser, OPI, My Vampire is Buff. I find nice neutral colours like this are perfect in summer with a good tan. My tan is getting there with beautiful weather lately :)


My Vampire is Buff is one of my favorite full coverage neutrals. The formula is great, only needing two coats for full opacity and evens it's self out well.


The actual shade it's self is a pale nude, definitely not a mannequin hands match for my own, but I do think it works well with my skin tone. It must be the pale yellow undertones. It also works great as a base for nail art and such, more in that in my next post!


Overall, wear was great and worked perfectly for a light, neutral nail without using a stark white.


Wednesday, April 1, 2015

Cosmic Fate

Holo photo spam ahead!

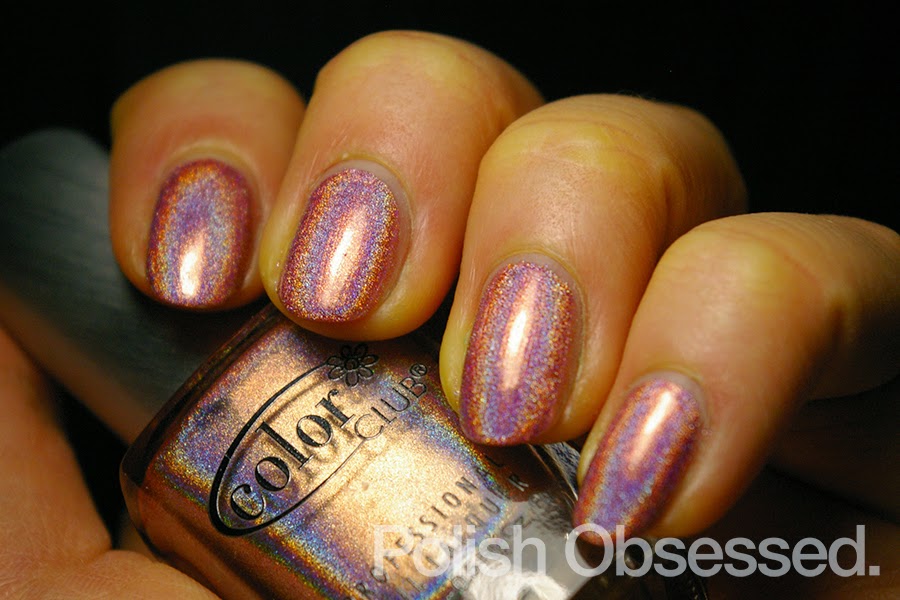
I haven't worn a holo polish in a while and was feeling springy, so today I have (what I think is) Color club Cosmic Fate. This polish doesn't have a label at the bottom unfortunately, but I am pretty sure it is Cosmic Fate... I hope!


In the bottle the shade appears to be a peachy nude holo, but on the nail it looks more of a peachy pink, more saturated that I originally thought it to me. Maybe it's just my skintone? I am still wearing my Bio Seaweed Gel base, I find that when I have worn this before under a holo polish it really helps the holo to come through more and look glossy without a topcoat. It also makes application a breeze! I don't recall if Color Club's formula for holos is usually difficult, however, I did not need to apply a special (ie. Aqua Base) base polish.


I only needed two medium coats for full opacity and it dried quickly and smoothly as most holos do. What a rainbow effect! So fun and bright. Below is a photo of my rarely seen right hand, in case you can't tell in the photos above, I had a break in my middle nail, of course, just when everything else is growing out perfectly! I figured I should include a photo with a more even length of nails.


I plan on filing my nails down a bit, not to match the break exactly, but to help them look more even. I'll do this after removing the gel base in a few days.

Monday, November 24, 2014

Pink and Girly

The most basic, neutral manis always seem to me my favorite, and this was no exception. Every time I look at my nails I am mesmerized!


I started off with a layer of OPI, I Theadora You which is a pink leaning crelly nude polish. I had worn this polish when I first got it with horrible results. Judging by the ease if use this time around, it is clear that it was due to my own error the previously (oily hands) and not the polish its self.


 I Theadora You applied fantastically, sheer yet buildable, I decided to go with one coat so a hint of my white nail tips were visible. I then layered a previously untried OPI, Pink Yet Lavender apart of their 2012 holiday collection and collaboration with Mariah Carry. I really dislike the name for this polish, Pink Yet Lavender is made up of pink hex and small holo glitter. It is not very dense, only one coat was used over the base. I had considered adding another coat of each but was happy with the look of the mani as-is. 


Friday, October 24, 2014

Boo-gie Bats

Happy Friday! Halloween countdown: 1 week left! There is also only 1 week left to enter my Halloween giveaway here.

I finally pulled out my Bundle Monster holiday plates and created a simple but fun mani with a full nail bat design and Halloween themed glitter!

For this mani I used the following:

Base - Revlon Peach Nectar
Ring and thumb fingers - China Glaze Boo-gie Down
Bundle Monster plate - BM-H08


I applied two coats of Revlon, Peach Nectar over my base coat. Once that was dry I stamped some bats in black polish using Bundle Monster plate BM-H06 on three of my nails. For my ring finger and thumb nails I applied  a generous coat of China Glaze Boo-gie Down, a gorgeous mix of black, white, copper and gold glitters.


Boo-gie down is such an awesome glitter, I love it over the nude base. The colours remind me of sophisticated candy corn with yellow and orange replaced with shiny gold and copper. This is such a subtle and easy mani. I really love bold stamping over a nude base, especially when most nails are stamped, it's not so in your face or tacky.

DONT FORGET TO ENTER MY GIVEAWAY! It runs until the end of the month! You get to pick which set of nails files you like should you prefer a different colour

Wednesday, May 28, 2014

Godiva

I have been lacking in posts lately, mostly due to the fact that I have been super busy, that and leading to less polish changes and purchases. In a mad dash on the weekend I found just enough time for a polish change before a family event. So much was on my mind I didn't even know what shade I wanted to wear. Sometimes just choosing a shade takes up enough time on its own! I was hoping to wear something nude but knew it wouldn't dry in time for me to finish getting ready.


Lucky for me I had a few untried options on my desk, one of them being a pixie dust, Zoya to the rescue! Godiva was the perfect colour and easy to apply! Godiva is a nude glitter/shimmer textured polish. The formula was fantastic, not too thick or clumpy, very smooth and opaque. I only required two coats for full opacity, and although it took a tad longer to dry than the standard textured polish it hid any prefect ions perfectly!


The sparkle on this one is awesome and totally work appropriate. It remindes me of wet sand sparkling in the sunlight, I love this shade a lot more than I thought. The wear is also awesome, when I did get some chipping I easily filled them in and it blended in seemlessly.

Thursday, April 3, 2014

Did You Create Your Own for Bundle Monster?

I have really been lacking lately on the nail stamping posts. I have had intentions, but lately I have been loving the shades I am wedding so much I have been touching up the chips and not having enough time for stamping. Today I have a nice neutral patten and I love it!

 photo IMGP8757_zps6e3c131e.jpg

 photo IMGP8781_zpsac4670cb.jpg


I used China Glaze Don't Honk Your Thorn as the base and stamped a full nail pattern from BM-410 in black. This design is from last years Bundle Monster Create Your Own collection, this is probably one of my favourites from the collection.

 photo IMGP8783_zps6c95a6e1.jpg

 photo IMGP8788_zps25f759f4.jpg

Bundle Monster ran another Create Your Own contest for this year and the submission deadline was at the beginning of the week. I defiantly put a little bit more thought and effort into this years submissions and am excited for the new collection! I was lucky enough to have four of my designs featured in the current collection so I hope I make it again! Below are some of my doodles/brainstorming for this years submissions.


Don't Honk Your Thorn is a perfect base for this sketchy pattern. It's simple and clean, but eye catching and interesting at the same time. I have already received many compliments, including one I count from a two-year-old who was mesmerized by my nails and kept pulling my hands in for a closer look!

 photo IMGP8786_zps809a06ae.jpg

Have you submitted any nail designs for this years Create Your Own contest for Bundle Monster?

Thursday, December 19, 2013

Nude Nails

I have a lovely Zoya nude to share with you today, Lulu. I actually forgot I had purchased this one! It somehow appeared on my desk the other day and I realized I had never worn it before, so here we are. I would describe this as a Patrick the starfish (Spongebob) peach. I think this is why I originally purchased it, I heard it was a close dupe for Starfish Patrick by Rescue Beauty Lounge. From the swatches I have seen online, Starfish Patrick  appears to be more opaque and brighter in case you were wondering.

 photo IMGP7882_zpsa53b2e84.jpg

 photo IMGP7884_zps461f3489.jpg

 photo IMGP7886_zpscf0bf501.jpg

I applied two coats to my nail, as you can see this polish is sheer. I would probably require one last thick coat for an opaque look, but I liked it at two coats. It cleaned up the look of my nail beds. Wanna know what else? I didn't add a top coat, didn't need to! It dried pretty quick and to a glossy shine, very impressive.

 photo IMGP7894_zps4ceef77c.jpg

 photo IMGP7888_zps30a89b2e.jpg

Now to find something to layer over it :)

Wednesday, December 18, 2013

Candy Cane Crush!

They should totally make a holiday themed candy crush, unless they already have and I am out if the loop, that would be awesome! Today I have an eligantly festive mani, it includes use of a sheer nude and a mixed finish glitter! I have really been loving the look of nudes topped with glitter, it is defiantly a grown up way of rocking glitter! Makes me want to try out some new nudes too!

 photo IMGP7908_zps2da64b14.jpg

 photo IMGP7905_zps7bf60d2c.jpg

 photo IMGP7906_zps56ba4134.jpg

 photo IMGP7901_zpsc3f80e9c.jpg

For my base I applied two coats of Zoya Lula which is a sheer peach nude. After two coats it was not opaque but gave my nails a nice foundation for the glitter, I just wanted to even out the colour of the nail and blend the free edge in to the pink nail bed.

 photo IMGP7897_zpseda6ad44.jpg

 photo IMGP7898_zpsd58838cf.jpg

 photo IMGP7900_zps24a1d0ce.jpg

Once I added my glitter polish on top it also helped with blending the nail bed and free edge of my nail together beneith. I used Finger Paints Kiss By The Tree, which is like candy canes crushed up in a bottle, applied in a dabbing motion to apply the glitter over the nude base. The clear base of the polish can be a little thick and goopy, I had to fish around the bottle a bit to saturate the brush with the right amount and type of glitter I wanted for each nail. The good news is that in doing this I got the perfect coverage for each nail, yay! The bad news? Bubbling :( lucky for me it is hardly  noticable due to all the smaller glitter pieces. Another pro about this glitter is the finish, I find a lot of glitter topcoats have a satin finish, this one is all gloss and I love it! I didn't need a top coat and it dried pretty fast, especially considering I applied a thick layer.

I love this look and will be wearing it to a Christmas party this weekend.