Monday, October 31, 2011

Happy Halloween!

Better late than never, right ;)

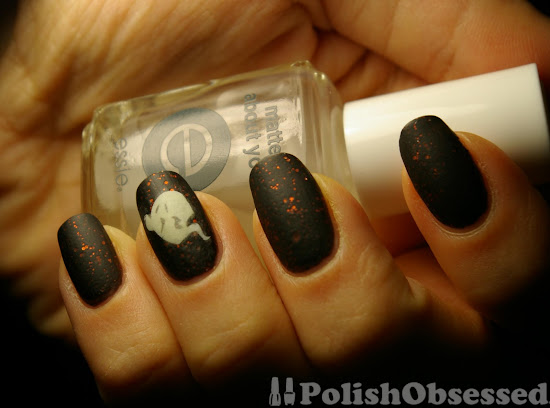
I'll keep this one short, Fortune Teller mattified with Essie's Matte About You top coat. I stamped my ring fingers with Bundle Monster plate, BM 224, the little ghosty. I then painted in the white ghosts with my Sally Hansen glow in the dark polish and mattified those nails as well.


Pretty simple, nothing over the top. I love how the orange multi-size glitter looks matte, like they are frozen in time!

I used 2 coats of China Glazes Fortune Teller, 2 coats of Sally Hansen's glow in the dark over the ghosts and 1 coat Matte About You.


 my camera did not want to focus on the little ghostie, although it glowed a lot! Finally figured out haw to get the bottle in full focus though ;)

Happy Halloween :)


Friday, October 28, 2011

A Halloween Tutorial - Pumpkin nails

Happy Friday! The Halloween weekend is almost here, and today I have a quick and easy tutorial with a slight twist from Asami's Pumpkin nails. It's basically the same idea, but I'm providing you with an alternative way of creating the jack-o-lanern face. Insead of using dry polish strips or halloween nail plates, I came up with an interesting way to make your perfect jack-o-lantern design . Below is the final look.


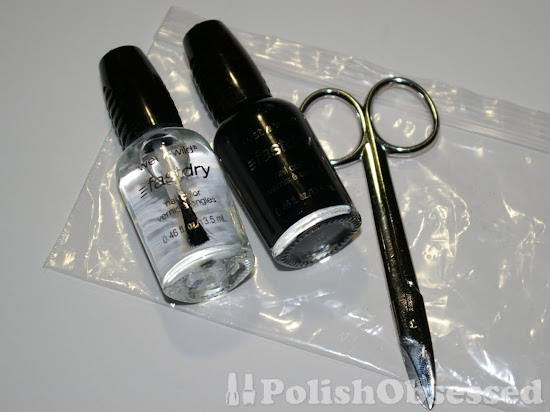
And this is all you need:
- A coloured nail polish you'd like for the design
- A top coat
- A plastic bag
- A pair of sharp scissors (small ones work best)

Tweezers will also be usefull!


First you want to grab your plastic bag and paint it generously with whatever colour you'd like to create your design in. I used Wet N' Wild's Ebony Hates Chris.


Once the polish is completely dry, you want to gently peel it off of the plastic and cut out your jack-o-lantern shapes.


Use your tweezers to place your shapes sticky side down on your nail.


Once you have all the pieces in the right place, you can finish everything off with a top coat!


Super easy right?! The design posibilities are endless and you can even create a whole pattern with polish on the plastic and transfer it to your nails.


One final Halloween inspired mani on Monday :)

Thursday, October 27, 2011

Trick, or Treat?

I can't express how much I love this polish! I thought I wouldn't get around to wearing it this year because there are only so many days left of October and it has been nothing but rain and overcast days.

Trick or Treat from Del Sol when in natural light is a sheer orange jelly base packed with orange and holographic glitter. I mostly see the green particles from the holo glitter, and it looks awesome! The great thing about Del sol polishes if you didn't already know, is when you are exposed to UV light, i.e. the sun, the polish changes colour!


This one has got to be the most drastic I have seen from this brand. When in the sun, the base colour shifts to a deep dark purple/black jelly. The sun was out yesterday and while I was at my desk at work I put my hand close to the window and it started to change! I really love the look of the colour when in the sun. I wish it was more sunny lately!


I couldn't get the colour shift to photograph accuratley, it is actually quite darker than the picture displays.

I applied 3 generous coats over OPI's ridge filler and didn't have any issues with VNL. I sealed everything off with a top coat, I suggest a super glossy one as it adds to the depth.

I love each colour on its own and even the shift in between, definitely a must have for Halloween :)

Wednesday, October 26, 2011

Halloween Nail Art Attempts - Part 2 + Glow in the Dark Comparison!

Today I have the second attempt of nail art I did over the weekend. I call this an "attempt" as I was not really happy with the final outcome. I love the idea, but I had some issues that I will discuss coming up.


The main idea was to have a glow in the dark manicure with a cool design on top. In order the get the best glow, I used a while polish for my base. I used 2 coats of Sally Hansen Salon's All the White Stuff. To make my mani glow I used my Sally Hansen glow in the dark polish because out of all the ones I own, this one seems to glow the best. I applied 2-3 coats.

Now, here is where it gets tricky... I picked a fauxnad plate with circle designs that look a bit like eyeballs and started stamping. Unfortunately, I got what I paid for from this Konad dupe plate, as it was really hard to pick up the full design. That combined with the base nail polish being not fully set is what made this a fail. Although I actually got through it and even finished it off with rhinestones, it still didn't look right to me. The only polish that would stamp properly was not a true black like the Konad polish which happened to be to thick to get in to the tiny intricacies of the design. I think if I had waited a day in between applying the polish and stamping it would have came out better. What do you think?


I also have a quick comparison of the glow in the dark polishes I own, from left t right I have Sally Hansen New Lengths Ceramics, Wet N' Wild Fantasy Makers, N.Y.C Frightful Fingers and a random polish from Dollar Giant (Which is now been bought out by Dollar Tree in Canada) This is obviously how they look in the bottle normally.


And here they are in the dark.


I have a feeling that the Sally Hansen and N.Y.C polishes are the exact same. I got them from the same place and at the time they were distributed, they were so out of Del Laboratories. Out of the 4 I own, these 2 have the best glow, I'd suggest 2-3 coats over a light colour for the best results.

The Wet N' Wild has an impressive glow also, but not so much in the photo. This is because all of the glow particles have settled to the bottom, and unless you shake it vigorously for who knows how long, you will not get the glow . Its funny how you can see the bottom of the bottle glowing though lol. I got this one last year, so I wonder if this years batch is different? The cute bottle obviously makes up for it though ;) When I used this last year I only applied 2 coats.

The dollar store polish comes in last for me. Besides smelling super bad, you need too many coats to get this one to glow. I think I needed at least 4 and it still wasn't as glowy as the others :(

Tuesday, October 25, 2011

Halloween Nail Art Attempts - Part 1

Over the weekend I had some free time and decided to try out some nail art ideas I had. For the first one I will be showing you today I took inspiration from this video from Andria (AKA, plasmaspeedo, YouTube). I had never done a gradient sponge mani before so I decided to try it. It was actually pretty quick and easy. It was really fun and I'd love to try it again sometime :)

Basically, the gradient is supposed to represent the sun setting, or in my case rising, with the foreground in the shadows.

The colours I used for the gradient were:

China Glaze - Lemon Fizz
China Glaze - Papaya Punch
OPI - Paploma Purple

I basically removed the rubber part from my Konad stamper, cut a cosmetic sponge and fit it in to the handle :) This really helps to keep your fingers clean while stamping. I layered the 3 colours 1 below the other on sponge then proceeded to sponge the colour on to my nails. I did this 2 times per nail to build up opacity. I also got some other regular sponges from the dollar store to try out, I noticed the actual Konad banded ones looked closer to the one I have in the photo below (dollar store). I haven't tried it yet so not 100% sure if it works as well as the cosmetic sponge.


Once that was dry, and it dried super quick, I cleaned it up a bit and took out some of my Bundle monster plates from the second setfor some nail stamping with black polish. I used bats, a "haunted" house and turned the pumpkin vines from the pumpkin patch stamp in to spooky trees! (BM-213 and BM-224)


I didn't apply a topcoat to this one, and if I were wearing it for a long period of time I think I would try a matte top coat to give it that dull, dark, Halloween feel :)


Stay tuned for some glow in the dark comparisons tomorrow, as well as a glow in the dark mani :)

Monday, October 24, 2011

Pretty Blue, Not Plum. + Spiders

One week left until Halloween! I was so stuck a couple of days ago trying to pick out a polish, I wanted something "Halloween" but just could not make up my mind.


I ended up settling on this beautiful deep indigo by Sally Hansen (10 Day No Chip), Plum Pretty. It has a slight silver shimmer that is very subtle, almost the same as Sally Hansen's Salon's polish, Honeydew.

This applied perfectly in 2 coats. I thought it would be an easy one coater but you definitely need 2, it gave perfect coverage.


I didn't apply a top coat to this one but it was perfectly glossy to be worn on its own. I'm very impressed with this one, I had been wearing it for 2 days in these photos and hardly any wear WITHOUT A TOP COAT!


A few days later I decided to add some silver spiders from the first set of Bundle Monster plates. I have been in Halloween spirits all week :)


Thursday, October 20, 2011

Say Hello To My Little Friends...

Today I have a quick post, I created these little ghosties over my Ick-a-body/Zombie Zest concoction.


I used a white nail striper (Kiss brnd) to draw and fill in the ghosts and black polish a dotting tool for the eyes and mouth.

Pretty simple and straight forward. If I tried this again, I'd so put some glow-in-the-dark polish on them :)

Wednesday, October 19, 2011

Ick! A Zombie! - Layering Goolish Polishes

I came up with this layering idea last year after Halloween and have yet to see someone else try it. Sure, Ick-A-Body looks awesome on it's own, but I just had to see what Zombie Zest looked like on top.


I added on thin layer of China Glaze's Zombie Zest on top of my previous many of Ick-A-Body and sealed everything off with a coat of Seche Vite. It's really cool how the orange glitter and green flacks blend together. Up close it looks so awesome, there is a lot of depth! From afar, the green looks more golden.


Here is a closer look...


Not too much more to say, it reminds me of pumpkins :) Have you tried this layering combo before?

Tuesday, October 18, 2011

Some Halloween Treats!

Although I love the scents that come out of Bath and Body Works, most of the time I have to pass because of the high price. I do love a good deal, and although some of these were a little up there in price for me, I just had to splurge on these Halloween themed beauty clearance items over the weekend.


2 Body Lotions in:
- Black Candy Apple
-Wicked Spiced Pumpkin
love the holo, shiny packaging by the way ;)

2 Hand Sanitizers in:
- Forbidden Aple
- Gumball (the eye ball glows in the dark!)

And I could not resist the Crazy for Candycorn lip gloss, so I picked up too. It smalls and tastes so yummy, and the gloss is layers in the bottle the same colour as candy corn, so cool :) So far it lasts super long too. As you can tell from the photo, also picked up some candy corn for snacking on, super sweet, but good in small doses.

Now this I wasn't expecting... I literally squealed with excitement! Ask my boyfriend, he was like wtf?


I was in The Superstore the other day doing some food shopping when I came across most of this collection. The weird thing is there was no display, it was at the end cap of the lotion section, across from the polish section with other Wet n' Wild products. I had to go on my tippy-toes to reach them! This is the first Wet n' Wild fast dry limited edition collection I have found in Canada, and I've been searching for this one! I almost didn't even shop there this week, pure luck finding it :)

Super glad I got my hands on Tangled in My Web, and the boyfriend liked Correction Tape, so I picked it up too.Yup, there's black glitter in there!

Monday, October 17, 2011

ICK!!!

It's getting closer to Halloween :) We are practically half way through the month of October now and I am really starting to get in to the spirit of Halloween. It's almost as though I can feel in the air, cooler breeze blowing the leaves off the trees... I love Fall :) Today I have a China Glaze polish from last years Halloween collection, this is Ick-A-Body.


Shown here are 2 coats, I wold describe this polish as a very dense orange glitter in a murky, deep green base. Not sure if I'd call the base a jelly, but it wasn't a cream either. It was a bit transparent but did not effect opacity of the polish overall.


I picked this up on clearance from Sally's after Halloween last year so this was my first time wearing it and I love it :) Such a great polish for Halloween. I would suggest adding a top coat to make it really shine.


Since there is so much glitter I was worried I couldn't get it even on my nails, so I started off with a thin coat first and a thicker second coat to ensure it was nice and even. The formula was good to work with, I had no problems, and it dried in no time at all.

Friday, October 14, 2011

Pumpkin Pieces

Wow, I can't believe it's already mid October, this month is going by fast. I fell like in September Halloween stuff was everywhere, now it's kind of settled. Hasn't really felt like a true October to me.

Today I have a fun mani with the same polishes I showed you yesterday, China Glazes Papaya Punch and Revlon's Orange Fizz. I added a coat of China Glazes crackle polish, Black Mesh.

The black really makes the orange pop, such a good combo :) The orange almost looks as if it is neon.


I really like this crackle combo, I can't remember if I've seen something similar before, but I'm sure I'm not the only one to think of black and orange crackle for Halloween. It has been wearing amazingly so far, I applied the crackle on Tuesday, along with a top coat of  Seche Vite, I wanted all the layers of polish to dry glossy and fast.

What do you think, any other ideas for a Halloween inspired crackle mani?


Thursday, October 13, 2011

Fall Fruit

Today I have a nice bright orange that is actually from China Glazes past summer collection, but I think it works nicely for a Halloweeny orange.

This is Papaya Punch, its a yellow based orange cream. I dept picking this one up and leaving it every time I saw it until finally it was on sale at the end of summer and I just had to pick it up!


These photos show two coats, and I could have used a third, not the greatest application. I had a few bald spots in the oddest places. You can see a bit better in the photo below, which is not an accurate colour representation at all as you can probably tell from the colour of my skintone!


So, how do we fix this? Add an orange shimmer on top :) I was at a Revlon warehouse recently and picked up all the colours from their summer collection. This polish is called Orange Fizz, and smalls really yummy. I added two coats.


Papaya Punch was nice and bright on its own, but the gold glass-fleck shimmer really makes it pop. In person it looks super juicy.


Looking back at my photos makes me want to sprinkle glitter all over my pumpkin this year lol That would so look bad ass :)

Wednesday, October 12, 2011

My First Ever Ruffian

Hello :) Today I have my first ever attempted Ruffian. I think it came out alright for my first try. I used OPI's Ginger Bells, the perfect pumpkin pie colour :) I wore this last year on Thanksgiving and this year too.


I used 2 coats, but could have gotten away with one, just wanted to get he curve perfect. The OPI pro wide brush really helped with that. I like how it's subtle, not too flashy.


What do you think, have you ever tried a Ruffian mani before? What colours did you use?