Showing posts with label chrome. Show all posts

Wednesday, April 8, 2015

Merry Easter!

Was anyone else's Easter reminiscent of Christmas morning? SNOW in April? When will this winter end! Luckily the weather was warm enough to melt the fluffy snow by the next day and the sun was shining brightly again Monday morning.

I wanted something light and bright for Easter so I chose China Glaze Dandy Lyin' Around. Little did I know it would also match the snow! Dandy Lyin' Around is a soft white crelly polish with a beautiful glass fleck shimmer that shines throughout. I used two coats in my photos below. It provided decent coverage at tow coats, however some people may be fore comfortable with three. It appears slightly more sheer in the photos than it does in real life.


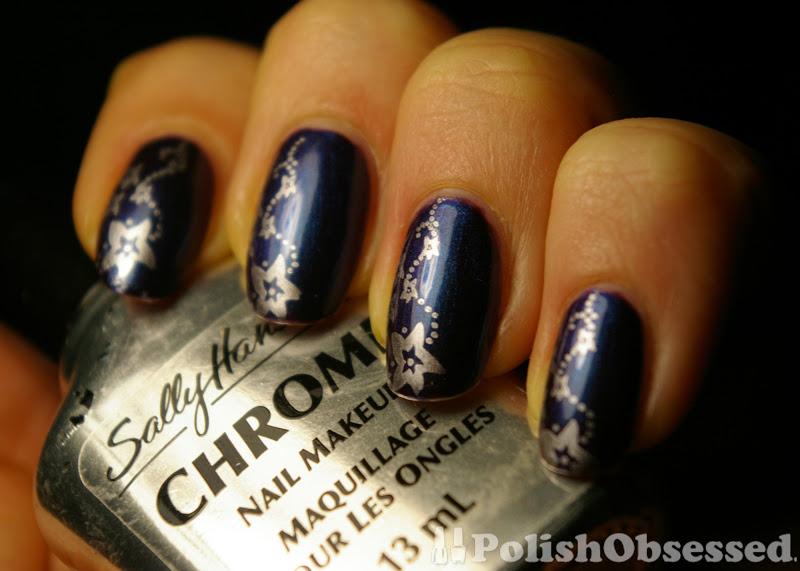
I decided an accent nail of chevrons would be a great pattern for Easter. I chose a soft pink, Sally Hansen "Chrome Nail Makeup" in Amber Chrome. It's been a while since I have used my nail art plates or a chrome polish. I'm not sure if it was my lack of practice or the plate it's self but the pattern was not 100% opaque, it looked like it had a texture running throughout. Luckily it was not completely visible to anyone but me, However, in a test mani I tried out before this one it bothered me to the point of removal! That post to come next week.


For the accent nail I used Bundle Monster plate BM-423. I have to get back in to stamping, so much fun :) Maybe once my China Glaze Road Trip polishes arrive in the mail I will be inspired with some spring printed nails.

Wednesday, March 25, 2015

...This is the Most Craziest Shit Ever!

I can't help but hum a Gwen Stefani tune while applying this polish! Although this polish has nothing to do with the song Don't Get It Twisted, OPI's Push and Shove is so crazy cool!

I had originally tried this polish shortly after it's release last year. It is now infamous for wonky application and short wear time and requires you to follow some steps usually not taken with regular polishes such as using a special base and no topcoat. Since my nails already had a base of Bio Seaweed Gel that I applied to avoid staining from this polish, I wanted to test how well the Push and Shove would apply over the gel alone when compared to the mini Lay Down That Base, base coat the polish comes with. That bottle is hilarious by the way! That is another reason I decided to try out a gel as my base, what happens when that tiny base polish runs out?


Compared side by side the Push and Shove over the gel base appears the same if not better then the Lay Down That Base, base. I used Lay Down that Base on my pinky nail and no base, other than the gel previously applied, to my other nails. Not only did it apply well, but the gel smoothed out my nail bed giving a beautifully even, streak-free mirror finish that is so awesome! My photos hardly do this polish justice!


You guys, my nails are literally tiny little mirrors, so shiny! Two coats were applied since I did not plan on applying a topcoat. I find you can easily get away with one thicker coat, but noticed during application that two thinner coats product better results. The gel base helps to smooth out any imperfections in my nail making the chrome appear strong and flawless... well as flawless as I think I can get! The best part is application was five about minutes, probably including dry time as well.

Unfortunately wear time is about the same as over Lay Down That Base. I for it for a few days, then when I couldn't stand  the tip wear and slight chipping I just changed my mani up.

Friday, December 19, 2014

I Was Frozen Today!

Hardly... All the snow we received last week is partially melting. I am still hopeful for a white Christmas, can you believe it's less than a week away?

Happy Friday by the way! Today I have a mani refresh with Essie, Blue Rhapsody, a frosty baby blue chrome polish. I decided to make it extra blingy with a coat of Essie, Stroke of Brilliance, a medium blue glitter topper with various sized hex glitter. In person my nails look positively frozen! 


The glitter also helped to cover up any tiny imperfections in the chrome base. I know now to use a good, thick base coat the next time I wear this, or any other chrome polish for a smooth and even application. I really liked this chrome and glitter paring and the look overall.


Christmas count down, only 5 days left!

Wednesday, December 17, 2014

Blue Rhrapsody

Today I have an icy blue chrome to share with you, Essie's Blue Rhapsody. I'm usually not a fan of chromes on their own but decided to give it a try, I mean the shade of blue is freakin' gorgeous. I was inspired by the falling temperature and snow for this one!


Blue Rhapsody is a light blue chrome polish that looks smooth and metallic in the bottle. On the nail it requires some effort in order to get it to smooth out to a perfect finish. I found that if I went over the same spot on the nail more than once i got some pulling. The application reminded me much of an true holo shade. I used a regular basecoat, but I know now for next time to use my Nfu Oh Aqua Base instead. I am wearing a fake nail on my right middle finger due to a painful break (not pictured) and it applied flawlessly to that nail only!


The second coat went on a lot smoother but it was difficult to get perfect application (on every nail but the falsey!). The polish was fully opaque in two coats and what you see is the polish on it's own with no base. I have plans to add a glitter topper to reduce the teeny tiny imperfections, although in my photos they appear a lot less.

Monday, February 10, 2014

Chrome Blocking

If you recall in my last post I didn't apply topcoat to my Push and Shove stamped mani. I WAS going to add a topcoat after I took the photo, but didn't want to smear anything. A few minutes later and a quick visit to the bathroom and it had almost all flaked off! I highly suggest adding a top coat shortly after stamping Push and Shove in order for the polish to stay on your nails! FYI - I have tested NYC In A New York Minute quick dry topcoat and noticed the slightest dulling of the high chrome shine. Let me know if you know a top coat that does not dull the effect.

 photo IMGP8302_zps747f65ec.jpg

I decided to test out Push and Shove again, this time with colour blocking. I was inspired my Gwen's nails in the promo for OPI's latest colab/collection. I used Zoya Storm as my base (again) and Push and Shove for the colour blocking. I basically applied striping tape to my nails in the shapes I wanted and filled them in carefully and quickly with the chrome polish. Be sure to move fast if you try this out, Push and Shoves dries quickly and you want to remove the tape before it dries.

 photo IMGP8299_zpsf07cd4d4.jpg

I taped off different sections than what was shown on Gwen's nails, I wanted to be a little more abstract with it. The result is pretty fun, a sparkly black base with a mirror chrome sections over top. Application with Push and Shove can be troublesome so I had to move quick with medium, even strokes. I did not apply top coat because I don't intend on wearing this combo for too long, it was more of a test. After the first day of wear I didn't experience any large chips, just slight tip wear.

 photo IMGP8296_zps782ea481.jpg

What do you think of Push and Shove? Any personal tips for flawless application?

Friday, February 7, 2014

Push and Shove - Stamping

Happy Friday!!

After swatching and playing around with OPI Push and Shove, I decided to try some stamping. This polish is starting to become notorious with application issues, will it even work with stamping or will it have the same issues as it does with basic application?

 photo IMGP8280_zpsaf1b5847.jpg

 photo IMGP8281_zps403f7259.jpg

 photo IMGP8283_zps178eeb29.jpg

 photo IMGP8288_zps4c18def6.jpg

 photo IMGP8290_zpsb583b8bf.jpg

Nope, stamps fantastically! I used Bundle Monster Plate BM-422, a honeycomb pattern, and stamped over my previous mani of Zoya Storm. The result was a perfect chrome finished intricate design, just look at that shine! I would recommend moving quick if using Push and Shove to stamp with, it does dry fairly quick. I didn't add a top coat because I didn't want to dull the effect. Pretty cool huh!? Like a space age honey comb!

Thursday, November 15, 2012

String of Stars

A short and sweet mani refresh today. I didn't want to take of Mysterious Curse Just yet so I stamped some designs on top.


I used a Sally Hanesn Chrome polish in Black Pearl, one of my favourites for stamping with. I also used my XL Cheeky stamping plate, plate E. I wanted something simple and sweet so I went with a string of star-like flowers and stamped them up one side of the nail.


The silver and purple are a good contrast, I had originally tried black and it didn't work, you could hardly see the design! This will keep me occupied for a few days :)

Wednesday, August 22, 2012

Wallpaper Nails

Today I have a mani refresh with Orly's Pixi Stix. For stamping I used Bundle Monster plate BM-201 and Sally Hansen Amber Chrome (apart of the chrome collection).


Amber Chrome is an amber/coral chrome and I find that it plays really well off of Pixi Stix. I think it is one of my fave chromes :). I find that chromes give the cleanest stamps.


The pattern I chose was geometric flowers. Since it's so linear and geometric it reminds me of wallpaper lol.


Not too much more to say about this one, just a super simple and quick mani refresh :)

Wednesday, January 18, 2012

Floral Chrome

After a couple of days wearing Mannequin I got some weird peeling at the edges. Not sure if this was the polishes fault or mine, I had done a good buff, clean and moisturize before polishing and may have made the nail too smooth lol. It has never happened with the base before (NailTek Foundation II), so may have been my fault.

To cover up the chips and seal the polish back to the nail, I did some fauxnading with my Bundle Monster plates. The full nail floral pattern used is from plate BM-205. I missed stamping so much, I feel like I haven't done it in forever. Sally Hansen Chrome Nail Makeup, Amber Chrome which is a soft, peachy chrome, was used for stamping for a tone on tone look.
\

I really like this design. At first it looked too young for me, but it's super cute and subtle, especially with the colour combo. It just looks so delicate and girly :)

Thursday, July 7, 2011

Animalistic

So close to the weekend! This week seems to be going by extra slow for me, and it doesn't help that the weather has been amazing this week, it really make me hate staying in all day at work :(
Hopefully this mani will raise your spirits if you feel the same as me, this is what I wore for my birthday on Friday July 1st :)

I got woken up earlier than expected, my boyfriend was taking me out for breakfast within the next hour so I had some time before he came to pick me up :) I pulled out my nail art plates and polishes and came up with this look.


I used a dupe of of the Konad plate M78 that I got from the Born Pretty store, but both plates are the same, so if you were to recreate this look, either would be fine. I love this leopard zebra pattern!, this is my first time using it. I used Sally Hansen's Black Pearl Chrome for stamping. Unfortunatly the stamp was not large enough for my thumb, so I used the zebra pattern from my new BM plates, this is plate BM-223. It almost gave full coverage, but my nails were a little too long.


I had a great birthday long weekend, the weather was perfect. I'm always torn on what I want to do with my nails on my birthday because it is also Canada Day. Maybe next year I will be more patriotic :)


To seal everything off I used a medium sized coat of NYC in a minute top coat, I love the high gloss and quick dry time.

Thursday, June 16, 2011

Playing with New BM Plates

Today I have a post I forgot to publish last week! It's a mani refresh with one of my new BM plates. I wanted to add a little something to Color Club's Pucci-licious to freshen it up a bit, but not too much because I would be taking it off the next day.

I decided to add the chain link fence/fishnet pattern from BM 209 to random nails.


Above is my rarely shown right hand with pink and middle finger stamped. And below is my left hand with my pinky and index finger stamped. I used a Sally Hansen purple chrome.


I am really loving the new BM plates, the intricacy of the images and overall quality are really impressive. And that issue I had written about before (defective image in one of my plates) was resolved, no questions asked, they sent me a brand new plate right away! I hope they come out with another collection soon :)

Thursday, April 28, 2011

Mani Refresh With Fauxnad

Hello ladies,

Today I have another mani refresh with my fauxnad Konad plates I talked about yesterday from the Born Pretty Store. As you can see these stamp great, I also used plate m78 for my easter mani look here. This was the first mani I did with them, I literally ripped them out of their packaging and started stamping once I got them!


So far I have only had one issue with 1 stamp transferring, the group of flowers from plate m77. I tried regular white polish that I use occasionally for stamping and nothing. I used chrome polish... nothing. I finally tried the Konad special polish and got a bit, but not all of the design. I think the image was not engraved enough to fully transfer which is a shame :( Maybe this was a defective plate? I will try again though and let you know what happens.


Most colour accurate photo

Anyways back to the mani, this was the franken I showed you last week, I used a Sally Hansen Chrome (Amber) to stamp. I know I'm showing the refresh super late but I really wanted to get in my easter mani before it became irrelevant. In fact, my next couple post will be of looks I sported last week lol it's going to be a little backwards this week, but I doubt you'll notice. I actually chopped my nails down in my Easter mani, got a break and cut them down.


overexposed to show detail

For some reason after the trim, most of my nails chipped and needed to be reshaped, I chose a bit of a squoval/oval shape now (You can see this in my mattified Easter nails from yesterdays post. Once I grow them out a bit I think I'll file them back square.

Monday, March 14, 2011

Houston... We have a Purple - Mani Refresh

Hello ladies,

I have a quick post today, before a removed Houston... We Have a Purple, I played around a bit with my BM plates. This pattern is actually really pretty and came out great!


Lamp light, most accurate representation of colour

I didn't actually wear this as a full mani, I had been wearing HWHAP for a while, but wanted to test out my skills for application os the smaller BM plates.


For stamping I used a Sally Hansen Silver Chrome polish, they always come out the best with stamped images and dry super fast.


I didn't have a problem with this pattern, I even got the double stamp on the thumb to come out almost perfect! I would definitely try out this pattern again.

What do you think of the BM full nail designs?

Thursday, December 23, 2010

A Party Hearty French - 2 More Days Until Christmas!

Hey Ladies,

Today I have another festive French to share with you! I really liked the look of my last French mani and I never really do them, so when I needed a quick mani change I thought I'd try out my new Nailene French manicure kit I purchased the other day to help me out.

I was sent another kit similar to this one from Nailene a while back (it came with a polish pen and a sheer base coat), but when I saw this one on sale I knew I had to have it! A quick overview of the contents include:

- Acrylic strong topcoat
- Sheer shimmer base coat
- White polish
- French tip nail guides

I won't go in to much detain on the kit, I mainly just used the white and tip guides.

The look I was going for was Christmasy but simplicity, that is why I chose to have a white tip with Party Hearty (pure Christmas in a bottle) on top.

I applied 2 cots this time of OPI bubble bath for my base. Once I was 100% sure that the polish was dry I applied my sticker guides, I love these things :)

look how long my nails are here! i chopped them down a bit last night, they were getting a little too long for me!

Unfortunately I had some issues with the white polish that came in the kit. It was a little thicker than I expected and the brush was a littler smaller that what I an normally used to. It was hard to apply the white polish. I'm not sure if it was because the formula was so thick, but when I carefully peeled the stickers off with my tweezers the polish wanted to lift off also :(


I ended up doing some freehanded touch ups, and since the lines weren't crisp I added a chrome stripe under like in my last mani. I finished everything off with Seche Vite because if I didn't the polish would have probably never dried!

Overall I think the mani is alright, I would have preferred it without the stripe it it is okay for now. I wore this for 4 days and got some chipping on day 3. I want to give this polish a second chance so i'll have to thin and test it out again.


What do you think?

Wednesday, December 22, 2010

Christmas Nails - Party Hearty Refresh

Hello Ladies,

Wow, only a couple of days left until Christmas! My family usually celebrates on both Christmas eve and Christmas day, plus I'm Italian so there's usually LARGE amounts of food involved! lol, but I love it, what's better than spending time with your family and eating amazing food for 2 days straight!?

Anyways, on to the mani. Below I have Party Hearty, it kicks ass, best Christmas glitter ever! I decided to use this (finally) for a quick and easy mani refresh on my red and green french I shared with you the other day.


To update my last mani I used a striper brush and a Sally Hanson chrome polish to carefully draw an outline along the smile line of the polish.


Next I added Party Hearty to my ring finger for some extra shine!


Pretty simple huh? I like really liked the French mani on its own but this was fun too :) I only wore it for a day or so before I moved on to something else.


What do you ladies think? What is your favorite way to use Party Hearty?

Thursday, November 25, 2010

Sally Hansen - Foil Polish Haul and Comparison

Hello Ladies,

Today I have some Sally Hanson Foils I just picked up. I was in a foil mood from seeing so much of the China Glaze Holiday collection foils and just happened to find these :)

From left to right: Applause, Rave Review, Brushed Gold, Antique Frost and Pure Metal.

I had picked up another one, but it was close to Pure Metal so I didn't swatch it.

Applause - a purple foil with what looks like some silver bits
Rave Review - a deep silver foil, looks like there is a hint of deeper shades in there also
Brushed Gold - a yellow gold foil
Antique Frost - a bronze foil
Pure Metal - a white/platinum silver

Below I have them swatched on my fingers:

click to enlarge :)
Thumb - Pure Metal
Index - Antique Fost
Middle - Bushed Gold
Ring - Rave Review
Pinky - Applause

natural light

Overall I would have to say that my favorites are Applause and Rave Review, they are definitely the most foily polishes of the bunch. Brushed Gold is alright too, but the gold is a little too yellow for me, same goes for Antique Frost, too bronzy. These 2 were also a little bit more frosty than I thought they would be.

Pure Metal was an interesting colour, it was a mix between a foil and a chrome, I think this one would work good for konading.

Click to enlarge :)

I'm glad that these ones were so cheap because I get to try them out and if I don't like them, I don't feel so bad :) I actually really do like them, it is very different for me, but I like it.

Over all these are decent, easy to apply, easy to remove. I'm pretty sure that there are a couple of collections in here, one sounds theater themed and the other is more metal/metallics. Does anyone know for sure? I wish each brand had a timeline of their polish collections, that would be so awesome!

Click to enlarge :)

Anyways, what do you ladies think? Do you like foils? If these were still around would you pick them up?